In my last four blog posts I’ve created an Azure AD Application in each. It is a priviledged operation in Azure AD which in larger enterprises is only held by a few. This quickly become a bottleneck since all the clicking in the Azure Portal is probably a new task that, besides consumes time, also requires ramp-up and some serious thoughts about how it should be handled in the enterprise’s organization. Like all repeatetive tasks, if you can automate them you save time, reduce the probability of error and also give you the chance to streamline the process. So in this blog post I’ll show you how you create the Azure AD Application entry in just a few lines of Powershell script that just takes 1-2 seconds to run.
Setting the stage 1 – Azure AD Application?
First, let’s set the stage of what we are about to do. An Azure AD Application is basically a record in the directory that gives your application the right to authenticate against the directory. Without it, some random person could write an application and let it authenticate against your enterprise’s directory. The record is there so only legit apps can do this. If you develop a new application in your organization or you have an existing one, it is very easy to hook it up to authenticate against Azure AD (see my 4 previous posts where I show how you do it in Python, node.js, Java and DotNet). If your application is built to support oauth and openid, it is really just a few config changes.
Setting the stage 2 – Azure AD? We have ADFS
Azure AD is just the natural cloud evolution of ADFS and Active Directory. If you simplify it, ADFS is HTTP interface on top of AD that you run your own infrastructure and datacenter. Azure AD on the other hand is the cloud equivalent where you move from your own datacenter to a SaaS service. But it is hybrid solution where ADFS and Azure AD coexist and cooperate – it is not a replacement (unless you decide it should be). Once you’ve hooked up your AD synchronization with Azure AD, Azure AD can act as your enterprise ADFS’s best friend and be the cloud endpoint for authentication. A common configuration is letting ADFS be the Identity Provider (IDP) and having Azure AD redirecting the authentication request to you current ADFS installation. This is a good configuration to have until you are ready to delegate to Azure AD to also do authentication.
Automating the creation of Azure AD Applications
Creating an Application entry in Azure AD isn’t the most complex task but it is a priviledged operation which means it’s not normally the developers in the project that can do it, but rather the administrators of the Azure AD. If you want to script this, the Azure Powershell cmdlet that you are looking for is New-AzureRmApplication
$app = New-AzureRmADApplication -DisplayName $Name -HomePage $AppUrl
   -IdentifierUris $appUri -ReplyUrls $ReplyUrl -Password $clientSecret
It will create the App much like you do in the old classic portal. The HomePage parameter is what is called “SIGN-ON URL” in the classic Azure portal and the Password argument let’s you create what is called a “key” in the portal. By default it creates a 1 year key (password), but you can supply a parameter called EndDate to make it last longer.
In the Azure Classic Portal, it generates a random key (password) for you but if you create the application using Powershell, you have to do this by yourself. The easiest way is to generate a new guid and pass that to the Password parameter. BUT, as is the case in the portal, once you’ve created the key (password), there is no way to read it back, so if you generate a guid, be sure to output it somewhere so you can copy-n-paste it.
Once you have created it you can retrieve the Application using the Powershell cmdlet Get-AzureRmApplication. There is also a Set-AzureRmApplication cmdlet for updating and Remove-AzureRmApplication for deleting it.
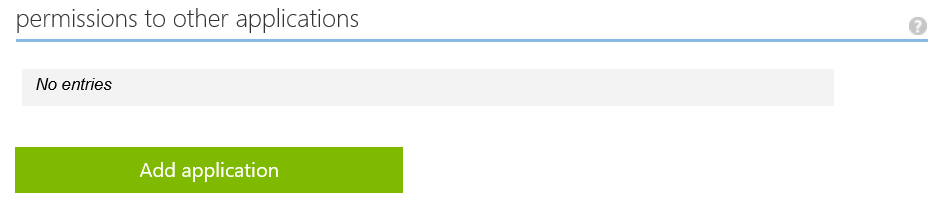
Permissions to other application.
If you try and run the WebApp after running New-AzureRmApplication, you will get an error message after typing in the userid/password authenication. This is because the New-AzureRmApplication cmdlet do not update what is called “permissions to other application” in the Azure Portal. If you Next-Next-Finish in the portal it does a sneaky trick of adding the permission named “Windows Azure Active Directory” with delegated permission “Sign in and read user’s profile”. What happens without this permission is that your WebApp doesn’t have the permission to log you in.
If you have been looking for what parameter to pass for permissions to the New-AzureRmApplication cmdlet, you can stop that. It doesn’t exist, regrettably. What you have to do is bite the bullet and finally learn some Graph API, because you will have to invoke one Graph API REST call to add this permission
$headers = GetGraphAuthHeader
$url = "https://graph.windows.net/$adTenant/applications/$($app.ObjectID)?api-version=1.6"
$postData = "{`"requiredResourceAccess`":[{`"resourceAppId`":`"00000002-0000-0000-c000-000000000000`",
`"resourceAccess`":[{`"id`":`"311a71cc-e848-46a1-bdf8-97ff7156d8e6`",`"type`":`"Scope`"}]}]}";
$result = Invoke-RestMethod -Uri $url -Method "PATCH" -Headers $headers -Body $postData
It is really a very simple operation once you understand what needs to be done. In the classic Azure Portal, you have a MANAGE MANIFEST button in the CONFIGURE part of the Application. There you can download the App configuration in a json format and if you do you will see that there is an emtpy collection called “requiredResourceAccess” if you created an Application via New-AzureRmApplication. This is the collection that is shown under “permissions to other applications” in the portal.
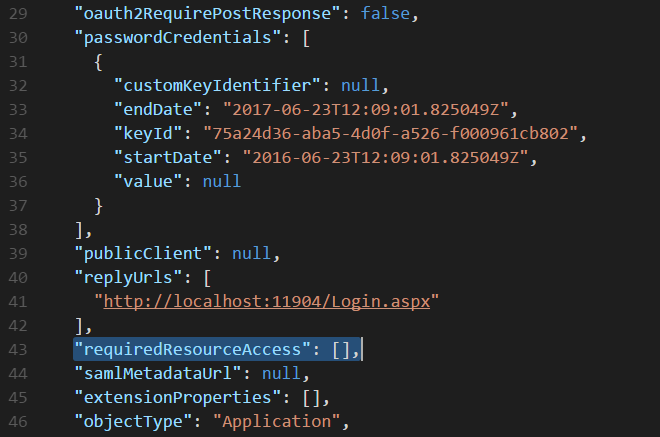
However, by adding the gobbely gook you see above as $postData we can fix this. What we do is updating the requiredResourceAccess collection with some predefined data. If you wonder how I knew these values, it was quite simple. I simply updated an Application in the portal and downloaded the manifest in the portal to compare the delta changes.
Calling the Graph API requires authentication which I will not explain here. Please see the source code for the Powershell script for that one. Please note that we can’t piggy back on Login-AzureRmAccount and we have to get the token again.
Putting it together
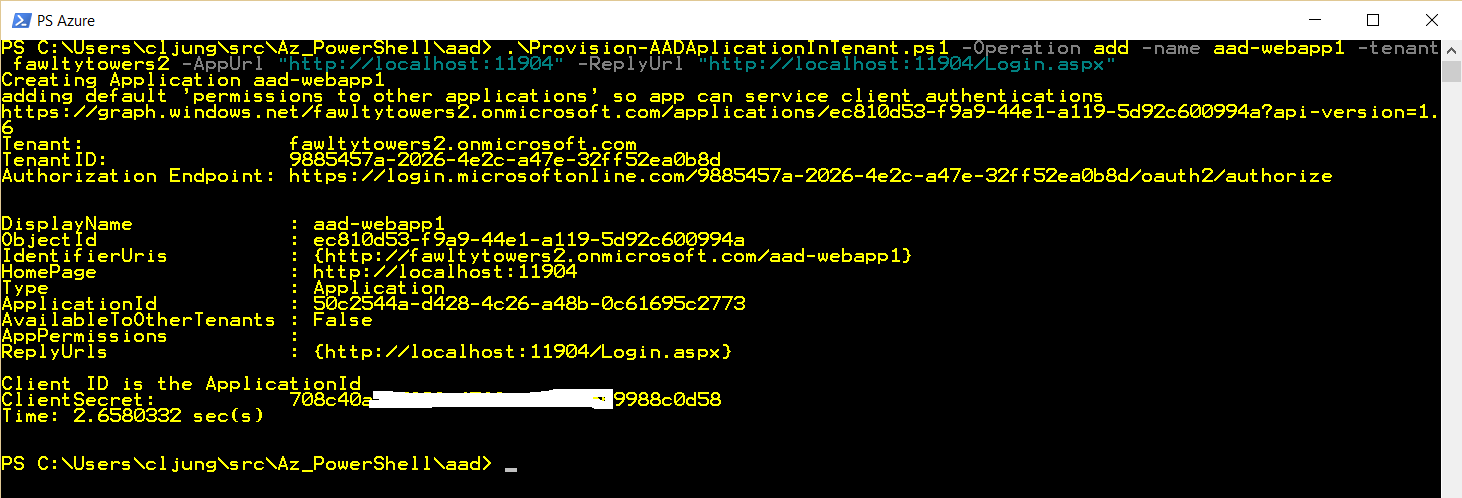
Below you see a test run of my Powershell script. It creates the Application entry in Azure AD, uses the Graph API to add the “permissions to othe applications” and output everything you need to update your Web.config file. The translation from tenant name, like fawltytowers2, to a guid can be done via making a WebRequest to the url https://login.microsoftonline.com/$tenantName/.well-known/openid-configuration. It will output in json the Authorization Endpoints for the tenant which includes the guid. What is called ClientID in the portal is called ApplicationID in the below output.
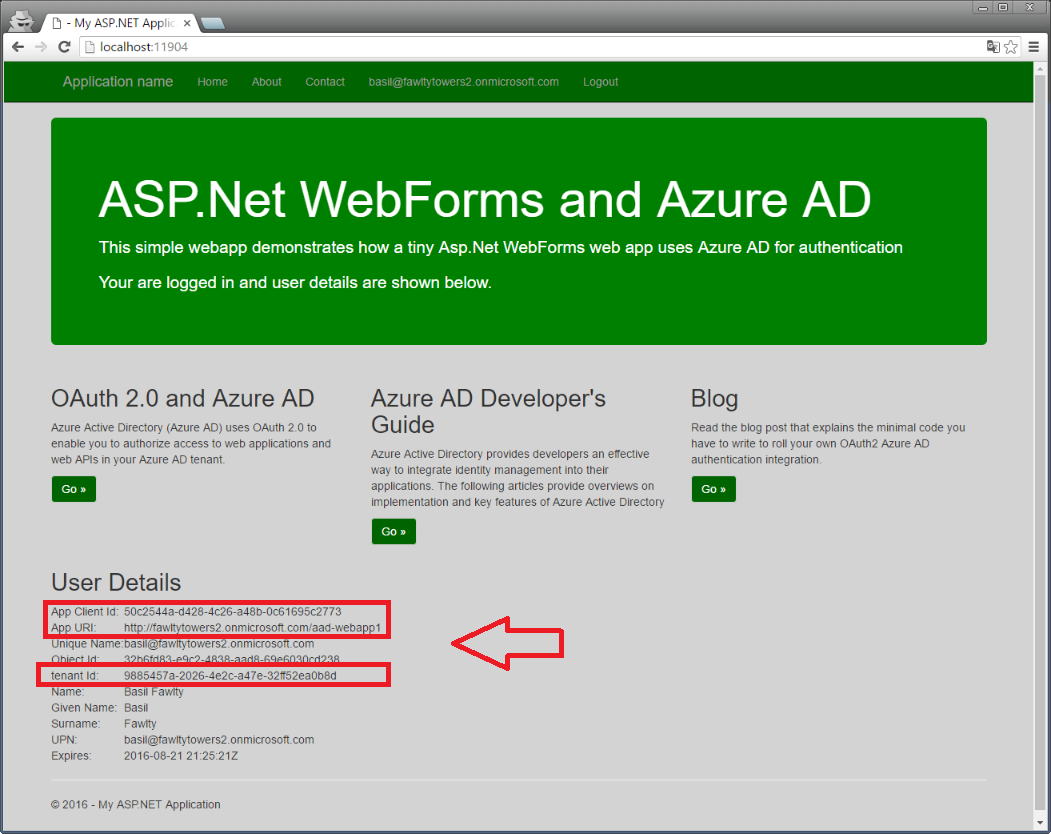
Without waiting more time than it takes to update the Web.config file, I’m able to use this new Application entry and use Azure AD as the authentication source.
Viewing the added application in the classic Azure Portal
Once you’ve created the Application using Powershell, your first instinct will be to scoot over to the classic Azure Portal and view it. You will be disapponted that it’s not there, even it you do a hard refresh. This is due to some caching problem of the portal and/or Azure AD. The Application is there and if yo want to view it, do the following
- Copy the ClientID/ApplicationID from the Powershell output
- View another Applicaiton in the classic Azure portal
- Modify the url and change the 2nd guid to be your ClientID/ApplicationID and refresh your Browser
https://manage.windowsazure.com/microsoft.onmicrosoft.com#Workspaces/ActiveDirectoryExtension/Directory/9885457a-2026-4e2c-a47e-32ff52ea0b8d/RegisteredApp/143e8…20e19f/registeredAppConfigure - Voila!
Tenant and Authentication while running the script
The fawltytowers2 tenant I’m using in this example is an Azure AD tenant I have created in my Azure subscription as a test directory. It is not the default directory for my Azure subscription, which is microsoft.onmicrosoft.com. When I created my test tenant fawltytowers2, I used my cljung@microsoft.com userid which makes me the Global Admin of this tenant. I have created a user called basil@fawltytowers2.onmicrosoft.com in this tenant and made this user a Global Admin. However, I can not use this user when invoking the New-AzureRmApplication since he is not associated with any Azure subscription. Basil is only a (very powerful) user in the AAD tenant, but can not fiddle with my subscription. So, therefor, when I run this Powershell script and hit the statement
Login-AzureRmAccount -tenant $tenantId
I login using cljung@microsoft.com but to my fawltytowers2 tenant. I’ve actually made the code “smart” enough to see if it’s trying to use a different tenant than the current default one. If I am trying to add the application to the Azure subscription’s default tenant, I don’t need to do an additional login (given I’m already authenticated to my subscription).
Summary
Creating an Azure AD Application and your enterprise organization will most likely create many applications in the years to come. Instead of training all resources that will carry out this task on how to operate the ever changing Azure Portal, you can very simple automate this task with Powershell. Since it is a priviledged operation, you also want to make sure not to create bottlenecks in your organization where people have to do manual labour that can be automated. The script I’ve shown you is nothing magic, however it is a bit complex since you combine the Azure Powershell with Graph API REST invokation and supporting tenants that are not the default ones.
References
Azure AD Application Manifest
https://msdn.microsoft.com/en-us/office/office365/howto/application-manifest
https://azure.microsoft.com/en-us/documentation/articles/active-directory-application-manifest/
Quickstart for the Graph API
https://azure.microsoft.com/en-us/documentation/articles/active-directory-graph-api-quickstart/
Supported Queries and Filters for Graph API
https://msdn.microsoft.com/library/azure/ad/graph/howto/azure-ad-graph-api-supported-queries-filters-and-paging-options#CommonQueries
Sources
Powershell script
https://github.com/cljung/azwebaadtiny
The Powershell script “Provision-AADApplicationInTenant.ps1 can be found in the same github repoas the tiny sample for using AAD as authentication source. This sample doesn’t use OWIN just to show you how easy it is.