This is the second post of several trying to explain how you protect yourself from a datacenter outage. It builds on the DR1 post where we created a website for www.psychedelicempire.com using Azure DNS and AppServices. This post will show you how to use Azure Traffic Manager infront of website deployments in two different Azure datacenters so that your company’s website is still up in case of an outage.
Azure Traffic Manager and choices, choices and more choices
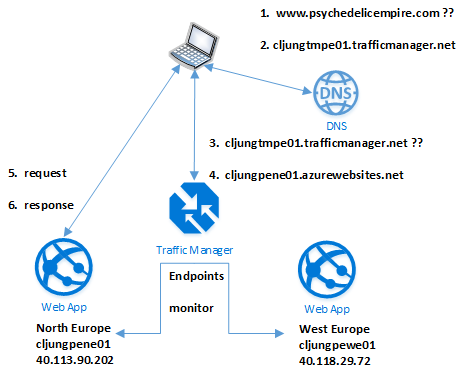
Life is full of choices and you have to get ready to make yet another one when you try to deploy you company’s website on multiple Azure datacenters using Traffic Manager (TM). Let’s look at the architecture of what’s happening when TM is involved.
1 – First, the browser does a DNS name lookup on the url you are browsing to, which is www.psychedelicempire.com in this case.
2 – The DNS server returns the hostname to your traffic manager resource – cljungtmpe01.trafficmanager.net in my case – since I have registered a CNAME record in my DNS server pointing www.psychedelicempire.com to cljungtmp01.trafficmanager.net.
So far there hasn’t been any Azure involvement (besides I happen to use Azure DNS – you could use any DNS server).
3+4 – The client then contacts Traffic Manager cljungtmpe01.trafficmanager.net and asks for an ip address and TM looks into it’s profile (and here the choice you’ve made becomes VERY important) and returns the address of a working endpoint.
5+6 – From then on, the browser works directly with the web server it has been directed to. Unless the local client DNS cache becomes flushed, it will not repeat steps 1-4 again. It will only be trafic directly the dedicated web server.
Traffic Manager Profile
The Traffic Manager Profile holds the set of endpoints where the website is deployed. In our case, it is two WebApps where one is deployed in North Europe datacenter and the other deployed in the West Europe datacenters. The profile also contains one other vital piece of information – how do you decide which endpoint to use when the browser asks?
There are three types of Routing Methods on how this decision is made. Unfortunatly, the names have changed between the old blue/white portal to the new rectangle frenzy one (for no good reason). However, the underlying meaning is the same.
- Performance (which wasn’t renamed) – means that in step 3-4, Traffic Manager will see which web server is closest to you and gives you the WebApp with the lowest network latency
- Weighted / Round Robin – means that Traffic Manager will distribute the load across all endpoints in a weighted fashion. The first version of TM had an equal weight, which meant an even distribution, but in the newest version, you can tweak the weight and influence how the load should be distributed.
- Priority / Failover – practicly means use the first WebApp as long as it’s available, but fall back to the other, if needed.
The Routing Method choice means that you have to decide how the multiple sites should perform. Are they equally live sites or is one covering for the other? If they are equally live, it’s Performance or Weighted you want (and this means dealing with data synchronization across two live sites). I will choose Priority/Failover when all my testing is done, since it reduced the complexity and also means we will have some Disaster Recovery at some point. During testing I will use weighted.
Transition from DR1 to Dr2
So, how do we transition from the solution I created in the DR1 post, where I had one WebApp that fronts the custom domain www.psychedelicempire.com, to something I described above? It is a multi-step approach with the below steps.
- Create the Traffic Manager Resource and add the existing website as an endpoint
- Change the DNS so that www.psychadelicempire.com points to Traffic Manager
- Deploy the website to the secondary site (West Europe in my case)
- Add the new West Europe website as an endpoint to Traffic Manager
Step 1 – Create the Traffic Manager Resource
To be able to test that Traffic Manager actually uses both endpoints when I’m done with all steps, my choice of Routing Method will be Weighted (Round Robin) with an equal weight. This I will change when I’m done testing.
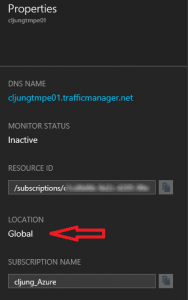
Creating the profile is a fast operation and you will see the result immediatly. The portal might need a Ctrl+F5 refresh to bypass what is cached. If you wonder what Location the Traffic Manager has, it is a global resource which means it does not stand or fall with a single datacenter. Would be a bit scilly to have a dual datacenter deployment fronted with something that is not and is a single point of failure.
To add the existing website as an endpoint, we must change it’s Pricing Plan from Shared to Standard, since it will not work otherwise. If you add an endpoint that is Shared or Basic, it will not work and the endpoint monitoring status will not be “Online”. If you demote existing website that is a TM endpoint from Standard to, let’s say, Shared, you will get the blue 404 “no website here” page.
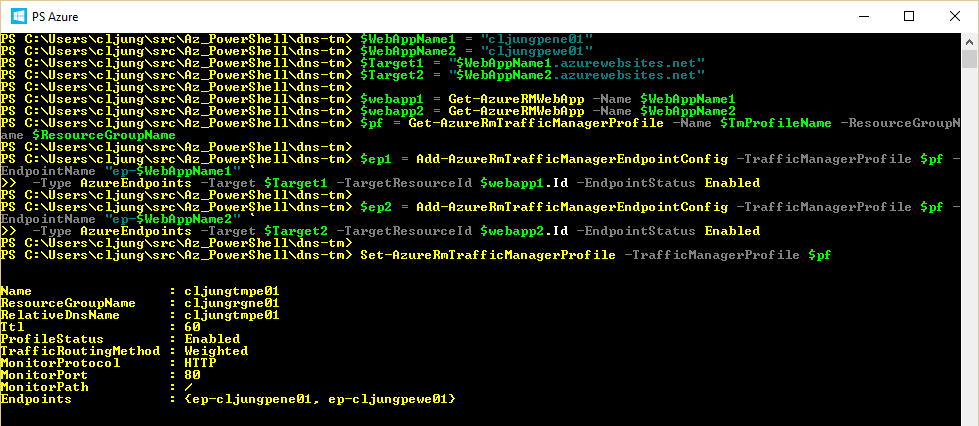
Adding the endpoint in powershell is done via invoking the following series of commands. You can find this in the references to the documentation at end, but I actually had to add the -Target parameter poiting to the xxxxx.azurewebsites.net to get it to work.
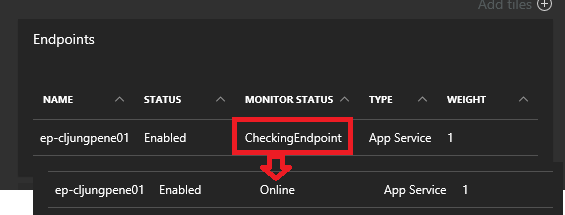
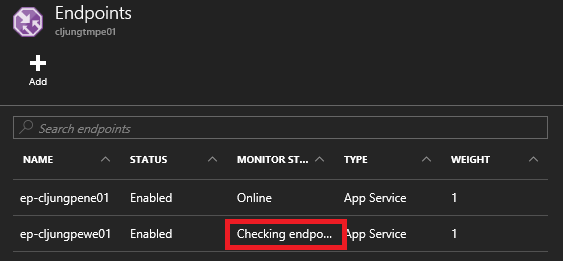
Once this command completes you will see in the portal that Azure probes the endpoint to see if it’s available and you have to wait for the Monitoring Status to become “Online” before you can test that it’s working.
If you are adding/deleteing the endpoint back and forth in dev/test cycles, don’t get dispared if TM isn’t responding when you try to browse to it since that is just DNS cache playing tricks on you. When it is Online, you should be able to browse to the TM profile name, which in my case is cljungtmpe01.trafficmanager.net.
Step 2 – Change the DNS so that www.psychadelicempire.com points to Traffic Manager
Now comes the time when it’s time to pull the rabbit out of the hat. You have TM working and you want to point your domain name from directly to your WebApp and to your Traffic Manager domain name. What you have to do is modify the CNAME record of your DNS server to point www.psychedelicempire.com to your Traffic Manager Profile, in my case cljungtmpe01.trafficmanager.net.
Hang on, you say! What about the host header and the stuff we did with onboarding the Custom Domain for the WebApp? Will that not break if we change the DNS CNAME record of www.psychedelicempire.com? No, It will not! The existens of the DNS record you created (explained in my prev DR1 blog post to let your WebApp from your custom domain) is just a one off thing. The WebApp will not periodically revalidate that and say “Hey, that CNAME record is gone, so I guess it’s bye-bye for this WebApp’s host header”. Once it’s registered on the WebApp, it’s there once and for all. The Only thing the DNS CNAME record of www.psychedelicempire.com is doing now is to direct browsers to your website. And that is what we will change now.
If you are uncertain about what is about to happen now, please check my DR1 post on the screenshot “My entire Azure DNS settings looked like below at this point”. We are now changing the “www” entry
Sidenote – Here is the benefit of using Azure DNS, because I’m in total control of what’s happening to the DNS zone psychedelicempire.com. If you are working with any other DNS hosting provider, you may need to roll your thumbs at this point and you will be in a state of flux not knowing when the DNS change will be propagated. I know, since the Azure DNS changes as soon as the powershell commands complete.
However, in a production migration scenario, I doesn’t really matter if the change is propagated or not, becasue if it isn’t, the clients browser will use the old DNS record and go straight to the WebApp and if the change is in, it will query the Traffic Manager Profile and end up at the same website (that is, if you did check that the TM url worked).
In my case, when I browse to www.psychedelicempire.com and get the website start page, I have to use a network monitor (such as netmon) to see if or if not the TM is into play here.
Step 3 – Deploy the website to the secondary site (West Europe in my case)
Since this isn’t the 101 on how to deploy web applications to Azure, I just assume you can do it or find somebody who can. What I did in Visual Studio is that I just right-clicked and hit Publish and then created a new Azure WebApp in the West Europe Datacenter under the name cljungpewe01 (as opposed to the one in North Europe called cljungpene01). Browse to it and see that it response.
Now, you have to register the Custome Domain of www.psychelicempire.com for this WebApp too, otherwise you will get the blue 404 “no page here” error since it isn’t authorized to respond on that hostname..
But, currently the www.psychedelicempire.com CNAME record is pointing to you TM profile (cljungtmpe01.traficmanager.net in my case). How do you proceed without removing that and causing downtime?
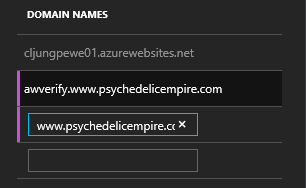
You should use the awverify.www.psychedelicempire.com CNAME record to point to your new website cljungpewe01.azurewebsites.net. Also, please note that you point straight to the website hostname and not awverify.cljungpewe01.azurewebsites.net. When you have done that in your DNS server, you can add the name awverify.www.psychedelicempire.com in Custom Domains in the Azure portal. Once you tab to the next input field, Azure will validate it and and put a red “!” sign if it fails finding that the awverify CNAME record points back to the website. Now before you save this, you can add www.psychedelicempire.com below and add that hostname too without the CNAME record pointing to it.
If you test this and put your second website in the same Service Plan, you will get the error message “The hostname is already assigned to another website”. This is because you can not have two websites in the same service plan trying to be the same custom domain name.
Make sure your new site works by browsing directly to it (cljungpewe01.azurewebsites.net in my case) and then change the pricing plan to Standard before moving on to the next step.
Step 4 – Add the new West Europe website as an endpoint to Traffic Manager
Before proceding with step 4, you should have a working TM profile fronting your domain (www.psychedelicempire.com) that has one (1) endpoint pointing to your primary site. You should have tested your secondary site and you should have bumped that site to the Standard Pricning Plan.
If all of the above is a GO, then we can add the second endpoint to our Traffic Manager Profile. There will be no downtime or penalty, except if your secondary website does not work and you are using the Weighted Routing Method as I am, you are in for trouble once the TM profile accepts the 2nd endpoint with status “Online”.
The screenshot below of powershell executing is a bit missleading, since it is from a testrun where I added both endpoints at once, but you can add the second endpoint by just reducing the code if you like.
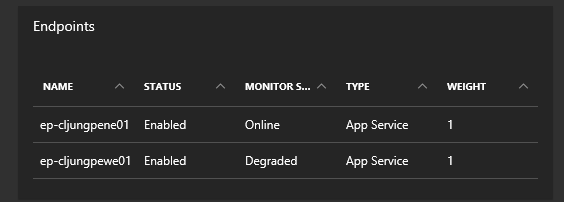
If you add the second website, the portal will show that Traffic Manager picks it up and checks the endpoint. As soon as the Monitor Status changes to “Online”, you have a website that operates in two datacenters.
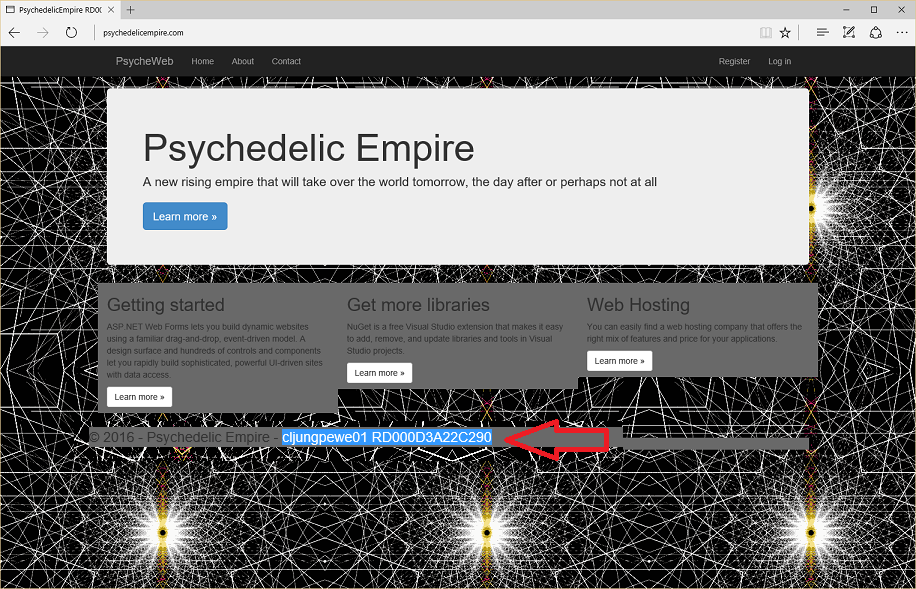
I have modified the footer on the website to show the WebApp site name and the server name so I can see where I am. In the below screenshot you can see that browsing to www.psychedelicempire.com takes me to West Europe.
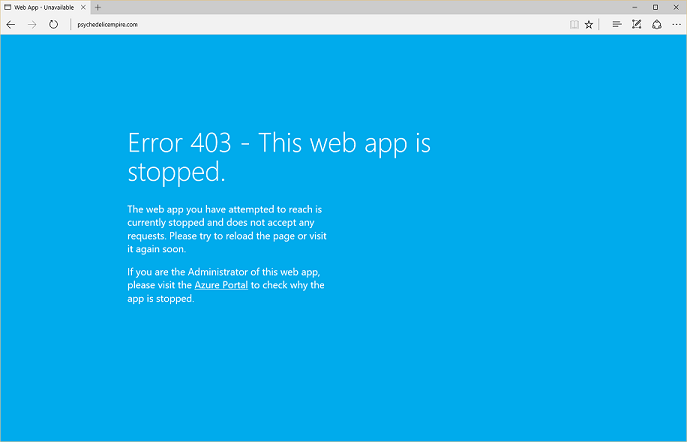
At this point, I can simulate a datacenter outage by stopping the West Europe website in the portal. If I do that and continously hit F5 in the browser, I will get the blue 404 “no page here” response from Azure until Traffic Managers monitor probe understands that the site is gone.
During this time, the endpoints Monitoring Status will be “Degraded”
When you test this and feverishly hit F5 and still get the blue error page, it is your local DNS cache that plays you the trick. Remember the top architecture drawing. Traffic Manager is out of the picture once step 3-4 is completed and the browser then talks directly to one of the websites. So either you have to test this on another machine or session or you just have to wait for the local DNS cache to timeout. Below you can see that I’m directed to North Europe if I open a new browser and go to www.psychedelicempire.com
Summary
This was perhaps a long post and again not so much about Disaster Recovery but rather how to avoid being in a place you don’t want to be. I showed you the exact steps of taking a running website that fronts a custom domain, redeployed the website on two Azure datacenters and putting Traffic Manager on top of it making it resilient to a single datacenter outage. If this was production, I would still have to make the choice of how the dual sites would work together as I described at the top of the post. If I go with Performance or Weighted, I would have to start thinking of how the back end data services would handle data synchronization between the two sites, since there isn’t a single master anymore. If I go with Priority/Failover, I would have have one site being the master, but I would have to start thinking of how the failover should occur and what that means. This will be described in the DR3 and later posts. Stay tuned!
References
Azure RM for Traffic Manager
https://azure.microsoft.com/sv-se/documentation/articles/traffic-manager-powershell-arm/
Benjamin Perkins (a Microsoft Support Engineer) has written several good articles on Traffic Manager that I advice you to read. Keep in mind, they are pre-ResourceManager era.
Sources
I will provide the sources as soon as I’m almost complete with this DR-series
