This post can be sorted under the section “because you can” since it is a combination of the following:
- Java REST API developed in IntelliJ IDEA and built with Maven
- VSTS is used as Source Code repo
- Jenkins is the CI/CD Build Pipeline
- Azure AppServices is the deployment target
If you are a .Net developer, you would use Visual Studio to develop your .Net Core 2.1 app and use VSTS as source code repo and CI/CD build pipeline, but if you happen to work in a Java shop, your faced with Java tools and this blog post is an attempt to show you what to do in that case.
Java REST API App
There are a lot of blogs out there that talks about the topic of Java and REST API, but I found most of them overly complicated if you just want to create the tiniest Hello World REST API. After searching, I found this to be the one to follow, since it is very simple and you don’t get a Godzilla sized code base to work with. https://medium.com/@nicolaifsf78/intellij-idea-maven-resteasy-tomcat-f95bb41e6362 . So kudos to student Nicolai Ferraris! I followed his instructions and created a Java REST API application that you’ll find here https://github.com/cljung/java-rest-api. It is very simple and basically returns a list when you call it with /api/items or an individual item when you call it with url /api/items/1.
If you have tomcat and maven installed on your laptop you can git clone the code, build via mvn package and copy the WAR file to tomcat’s webapps folder.
VSTS as Source Code repo
You can create a new project in your own VSTS environment and import my public github repo. The reason I choose to work with VSTS here is because it’s popularity out there in the customer enterprise space. It’s is rapidly becoming a widely used private source code repo system. I also choose it to prove the interoperability with Jenkins. A real life scenario could be that your organisation is using Github Enterprise, and if that is the case, this example is still applicable since it would work the same as using VSTS since both are private git-based repos.
Jenkins as the CI/CD Build Pipeline
Why didn’t I choose VSTS as the build pipeline since it has great Java/Maven support? Well, because it would have been too easy and because Jenkins is used out there a lot, especially as the build pipeline engine for Java applications.
How do I connect Jenkins to VSTS?
The answer is via an ssh public/private key pair. The easiest way is to use ssh-keygen on a Mac/Linux and generate a new ssh key. Then you create a new “SSH username with private key” in Jenkins. You open the private key in a text editor and copy/paste it in the Key section.
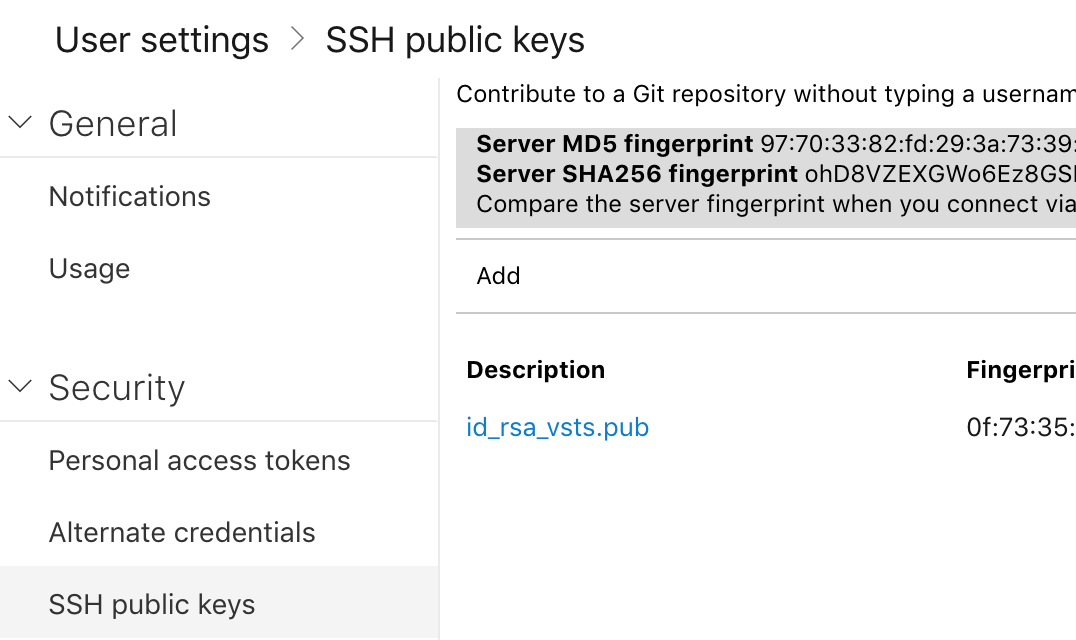
In VSTS, you click on your avatar (the picture of your logged on user), select Security and then add the public key. Again, you need to open your public key file in a text editor and copy/paste it into VSTS
With that, Jenkins has the possibility to connect to VSTS and do git pull, etc.
Jenkins CI/CD Build Pipeline
My Jenkins build server is an Ubuntu 16.04 Azure VM with Jenkins, Maven, Java SDK and Azure CLI installed on it. The extra plugins I’ve installed, beside the standard ones from the installation process, is Azure CLI Plugin. Without that plugin, you will have trouble adding Azure credentials later.
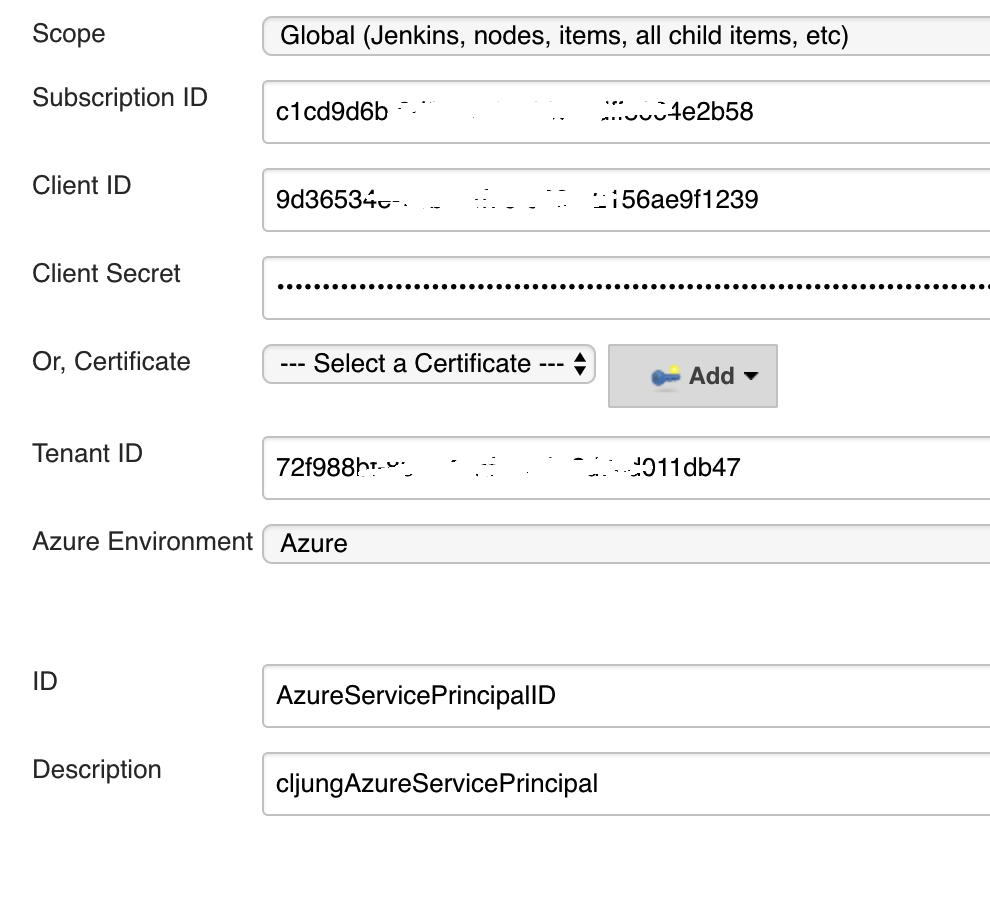
First, we need to create the Azure Service Principal credentials which Jenkins will use to deploy to Azure. There are plenty of documentation on how to do that in portal.azure.com available, but then you need to input values into Jenkins. If you copy the ApplicationID of your Service Principle and run the Azure CLI commadn “az account show” you have almost all you need. Then you go to Jenkins > Credentials and add new Global Credentials. If you don’t see Microsoft Azure Service Principal in the dropdown list, you have forgotten to install the Azure plugins for Jenkins.
In the following dialog, you paste in Azure Subscription ID, Tenant ID which you’ll get from the “az account show” command, and Client ID and Client Secret which you get from the App Registration in portal.azure.com (Client ID is called Application ID in the portal and the secret you have to create your self under Keys).
Next, we create the build definition item, give it a name and select the Pipeline project type. In the github repo, there is a file named Jenkinsfile in the jenkins folder https://github.com/cljung/java-rest-api/blob/master/jenkins/Jenkinsfile and it is a bit like what the Dockerfile is for when you build a docker container.
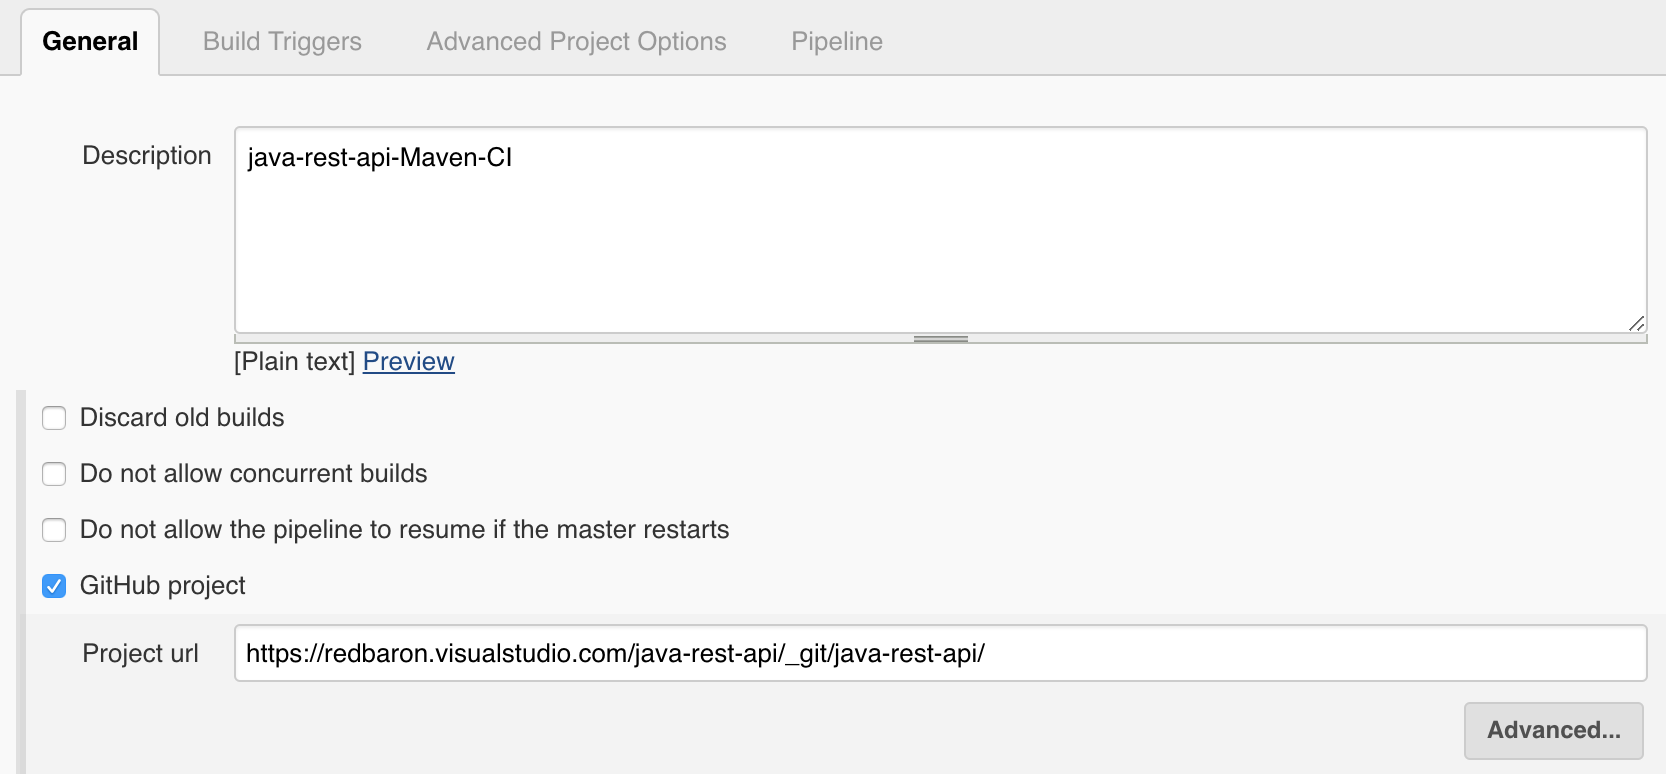
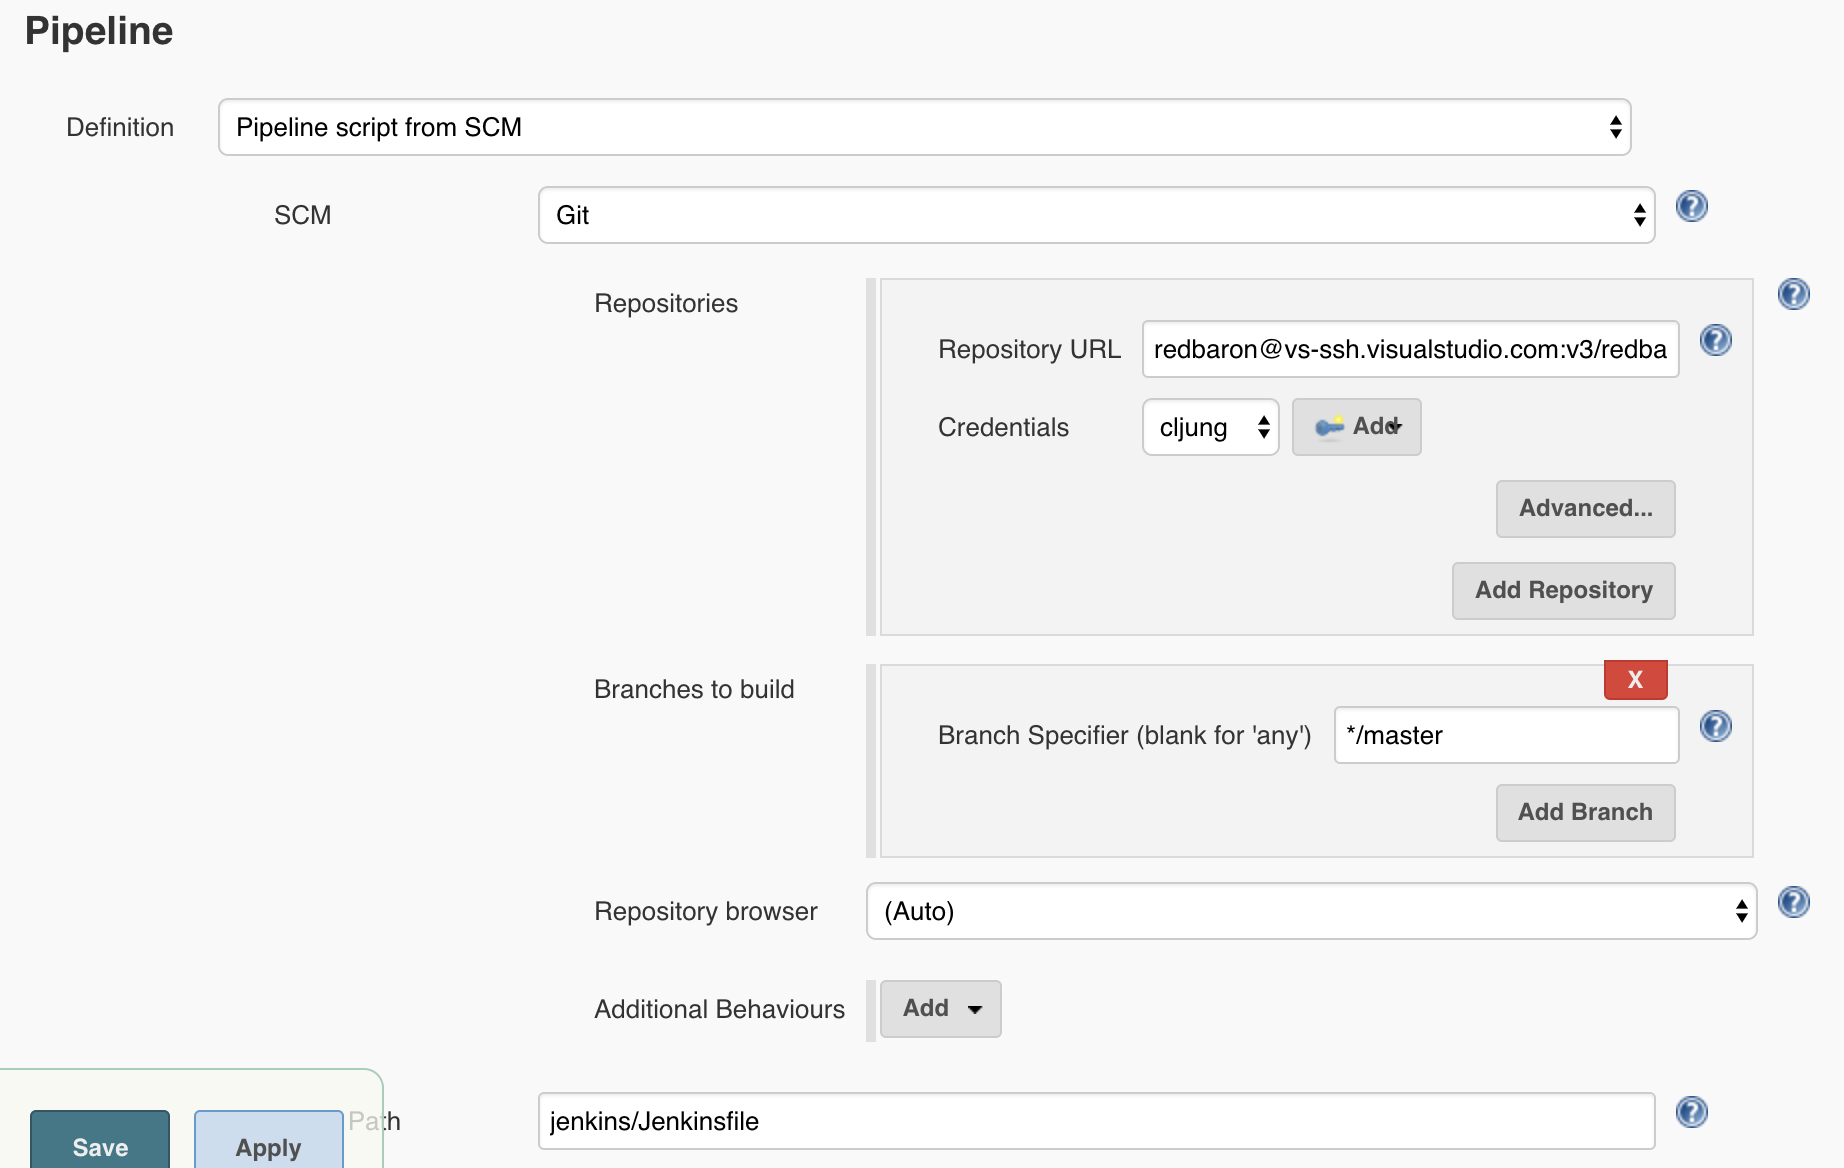
You select the Github project and paste in the url to your VSTS project.
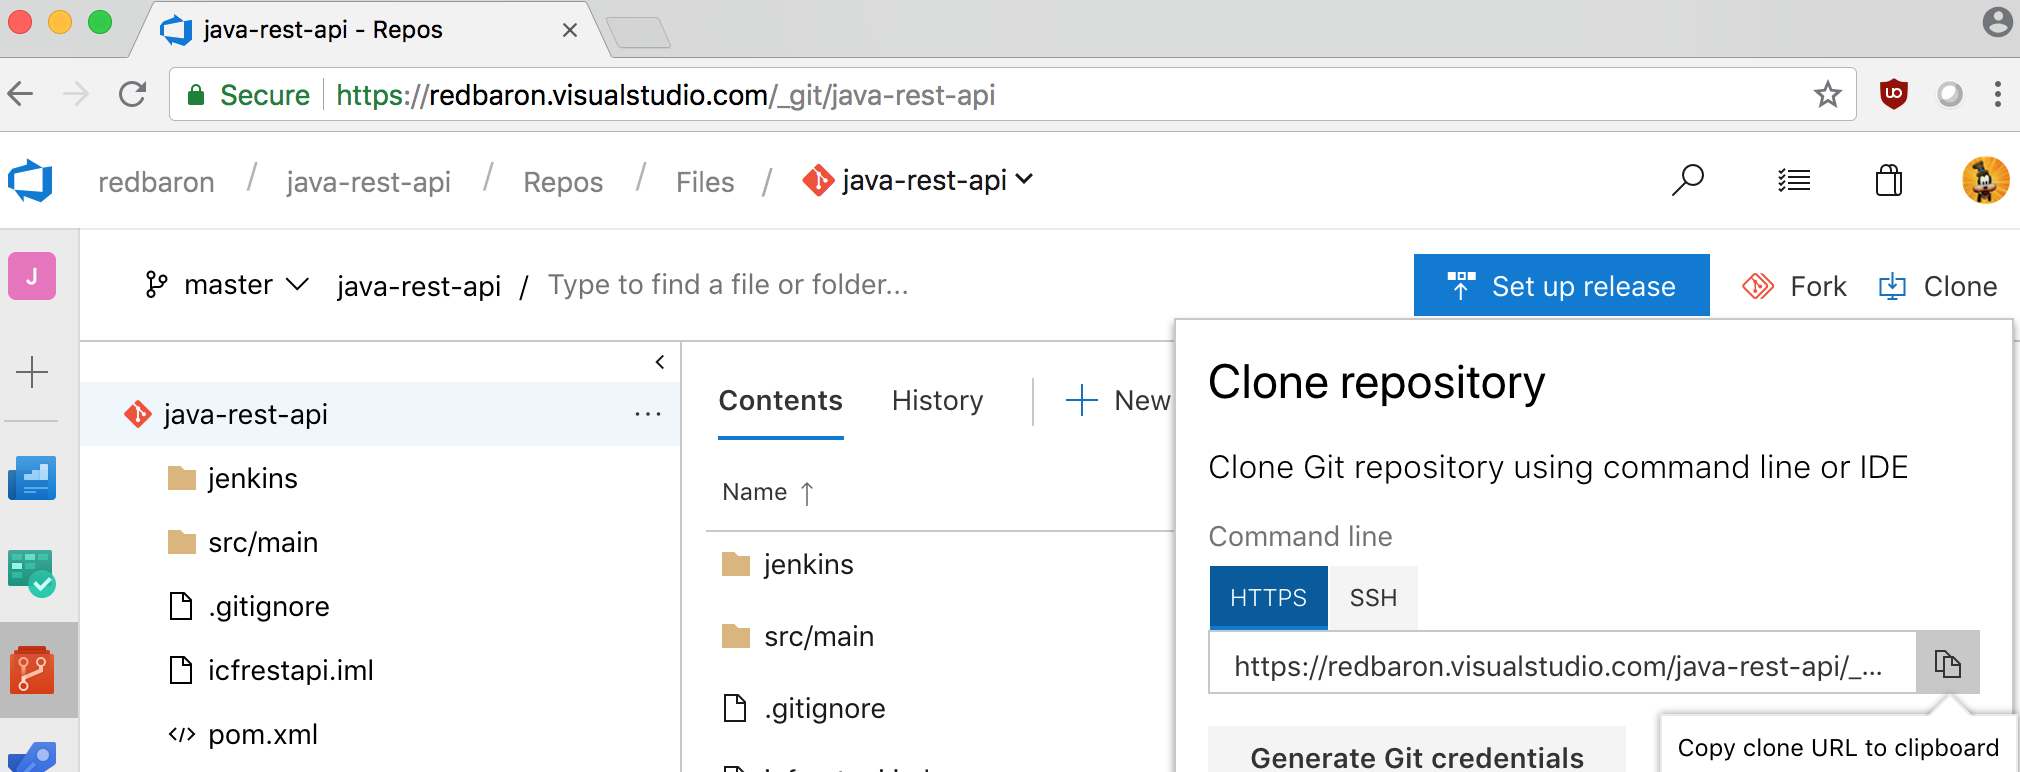
If you want to copy/paste that, you’ll find it if you navigate to Files in VSTS and press clone
To be honest, this url is more of a comment here since we will access VSTS via ssh. And in order to do that, you need to switch tab to SSH and copy/paste that url too.
The Pipeline script exists in VSTS and we need to select the “Pipeline script from SCM” in Jenkins and point it to the VSTS ssh url and select the SSH credentials we already setup for accessing VSTS (public/private key). In the Path field you enter the relative path to your Jenkinsfile, which is jenkins/Jenkinsfile in this case.
The idea of a Pipeline project in Jenkins is to let the Jenkinsfile define how the build looks like and not configure the workflow steps manually in Jenkins. This saves a lot of time like in this case where you don’t how to figure out how I did it in the Jenkins UI.
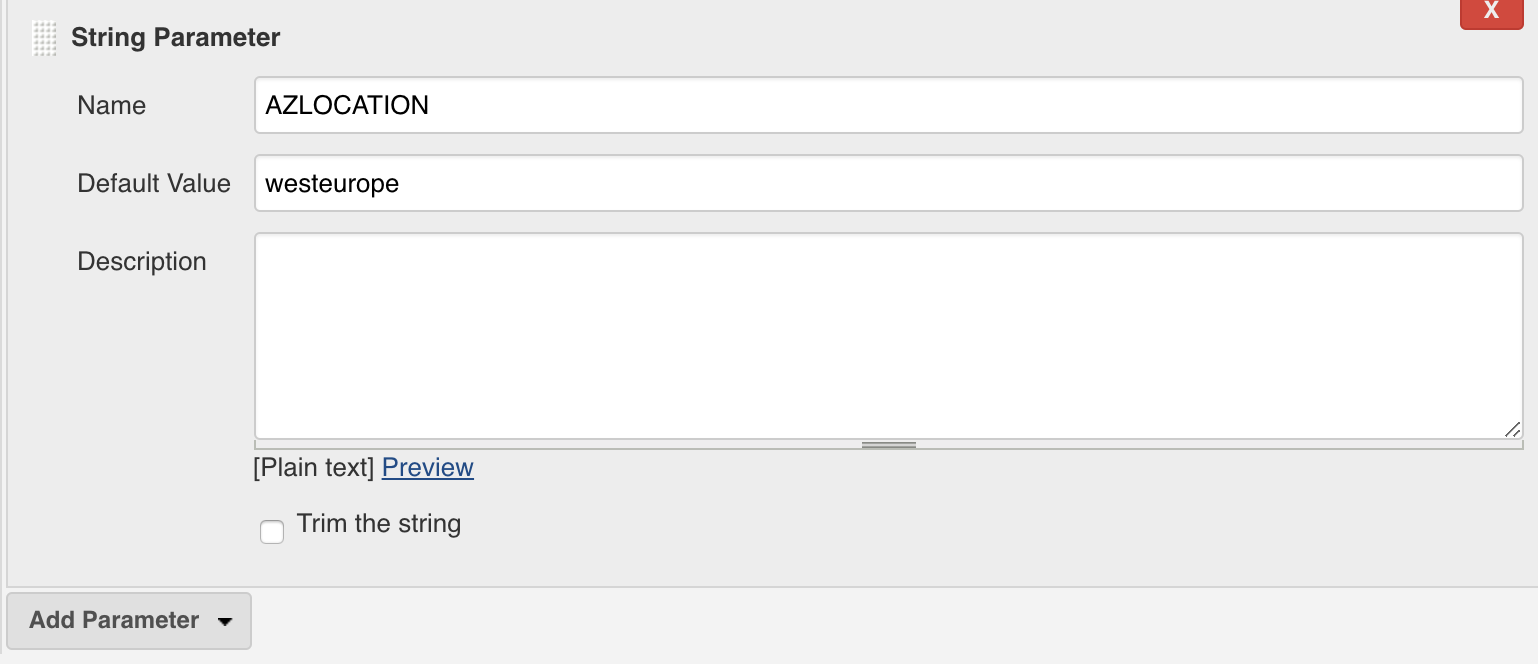
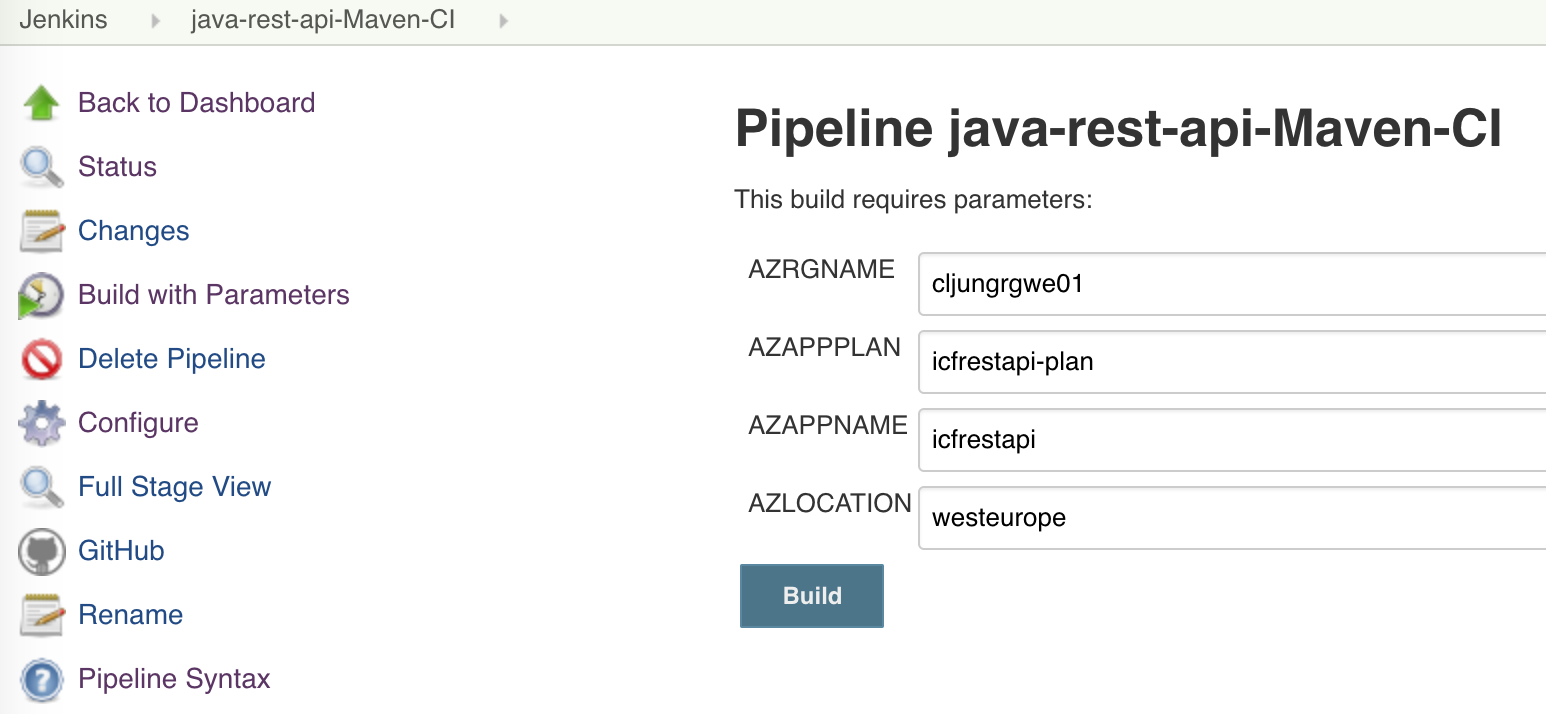
One thing remains and that is to define parameters for the build. My Jenkinsfile requires 4 parameters which are for deploying the code to Azure.
- AZLOCATION – Azure region, like westeurope. Use the values that Azure CLI uses (ie not West Europe)
- AZRGNAME – name of your Azure Resource Group
- AZAPPPLAN – name of your Azure AppService Plan
- AZAPPNAME – name of your Azure AppService within the plan. This will also be the url of your API deployment, like http://your-name.azurewebsites.net/
You can not use other names than those unless you want to edit Jenkinsfile and the bash script azappservice-deploy.sh
The Jenkinsfile and the Build Definition
The Jenkinsfile is yet another definition file and it’s not in xml, json or yaml format. It is in a syntax of its own. The agent definition tells Jenkins to build it anywhere suitable, which will be on the Jenkins server itself. An alternative would be specifying a maven docker image, but then you need to install Docker on the Jenkins server.
The environment section is used to pull the build parameters needed and set them as environment variables for the job. The bash script azappservices-deploy.sh totally depends on the environment variables to do its job.
The Build and Test stages executes maven and the Deploy stage is the one that deploys the WAR file to Azure. I’ve done it in such a way that the login and selection of Azure subscription is done inline and the more complex deployment is
pipeline {
    agent any
    environment {
        AZRGNAME = "${params.AZRGNAME}"
        AZLOCATION = "${params.AZLOCATION}"
        AZAPPPLAN = "${params.AZAPPPLAN}"
        AZAPPNAME = "${params.AZAPPNAME}"
    }
    stages {
        stage('Build') {
            steps {
                sh 'mvn -B -DskipTests clean package'
                archiveArtifacts artifacts: '**/target/*.war', fingerprint: true
            }
        }
        stage('Test') {
            steps {
                sh 'mvn test'
            }
        }
        stage('Deploy') {
            steps {
                withCredentials([azureServicePrincipal('AzureServicePrincipalID')]) {
                    sh 'az login --service-principal -u $AZURE_CLIENT_ID -p $AZURE_CLIENT_SECRET -t $AZURE_TENANT_ID'
                    sh 'az account set -s $AZURE_SUBSCRIPTION_ID'
                    sh './jenkins/azappservice-deploy.sh'
                }
            }
        }
    }
}
The Azure CLI code in azappservice-deploy.sh is pretty basic and creates the Azure resource group, AppService plan and AppService depending if it exists already or not. If you’re and Azure guy, you probably seen this multiple times. The part that needs a little explanation is how we deploy the WAR file, because this is done via using curl and doing a http POST to the Azure AppServices. The credentials for doing that post is retrieved via CLI from the AppService itself. The code is reusable since given you have defined the parameters in Jenkins, it can deploy any WAR file to tomcat in Azure.
#/bin/bash

# The env vars in this script should be set by the Jenkinsfile

echo "Deploying : ResourceGroup=$AZRGNAME, AppName=$AZAPPNAME, AppPlan=$AZAPPPLAN"

# create the RG if it doesn't exists
if [ $(az group exists -n $AZRGNAME) == 'false' ]; then
    az group create -n $AZRGNAME -l "$AZLOCATION"
fi

# create the AppService Plan if it doesn't exists
VAR0=$(az appservice plan show --name "$AZAPPPLAN" --resource-group "$AZRGNAME" --query "appServicePlanName" -o tsv)
if [ -z "$VAR0" ]; then
    echo "create AppPlan=$AZAPPPLAN"
    az appservice plan create --name "$AZAPPPLAN" --resource-group "$AZRGNAME" -l "$AZLOCATION" --sku S1
fi

# create the AppService if it doesn't exists
VAR0=$(az webapp show --name "$AZAPPNAME" --resource-group "$AZRGNAME" --query "defaultHostName" -o tsv )
if [ -z "$VAR0" ]; then
    echo "create AppService=$AZAPPNAME"
    az webapp create --name "$AZAPPNAME" --resource-group "$AZRGNAME" --plan "$AZAPPPLAN"
    az webapp config set --resource-group $AZRGNAME --name $AZAPPNAME \
                     --java-version 1.8 --java-container Tomcat --java-container-version 8.0
fi

# get userid/password to use for deploy
APPUID=$(az webapp deployment list-publishing-profiles -g $AZRGNAME -n $AZAPPNAME --query "[0].userName" -o tsv)
APPPWD=$(az webapp deployment list-publishing-profiles -g $AZRGNAME -n $AZAPPNAME --query "[0].userPWD" -o tsv)

# post the WAR file to Azure AppService
echo "Deploying WAR file to $AZAPPNAME"
cp ./target/*.war ./target/payload.war
curl -X POST -u "$APPUID:$APPPWD" --data-binary @./target/payload.war https://$AZAPPNAME.scm.azurewebsites.net/api/wardeploy
rm ./target/payload.war

# az webapp delete --name $AZAPPNAME --resource-group $AZRGNAME
# az appservice plan delete --name "$AZAPPPLAN" --resource-group "$AZRGNAME"
Running the Build
Select the “Build with Parameters” menu item, accept the parameters and kick off the build
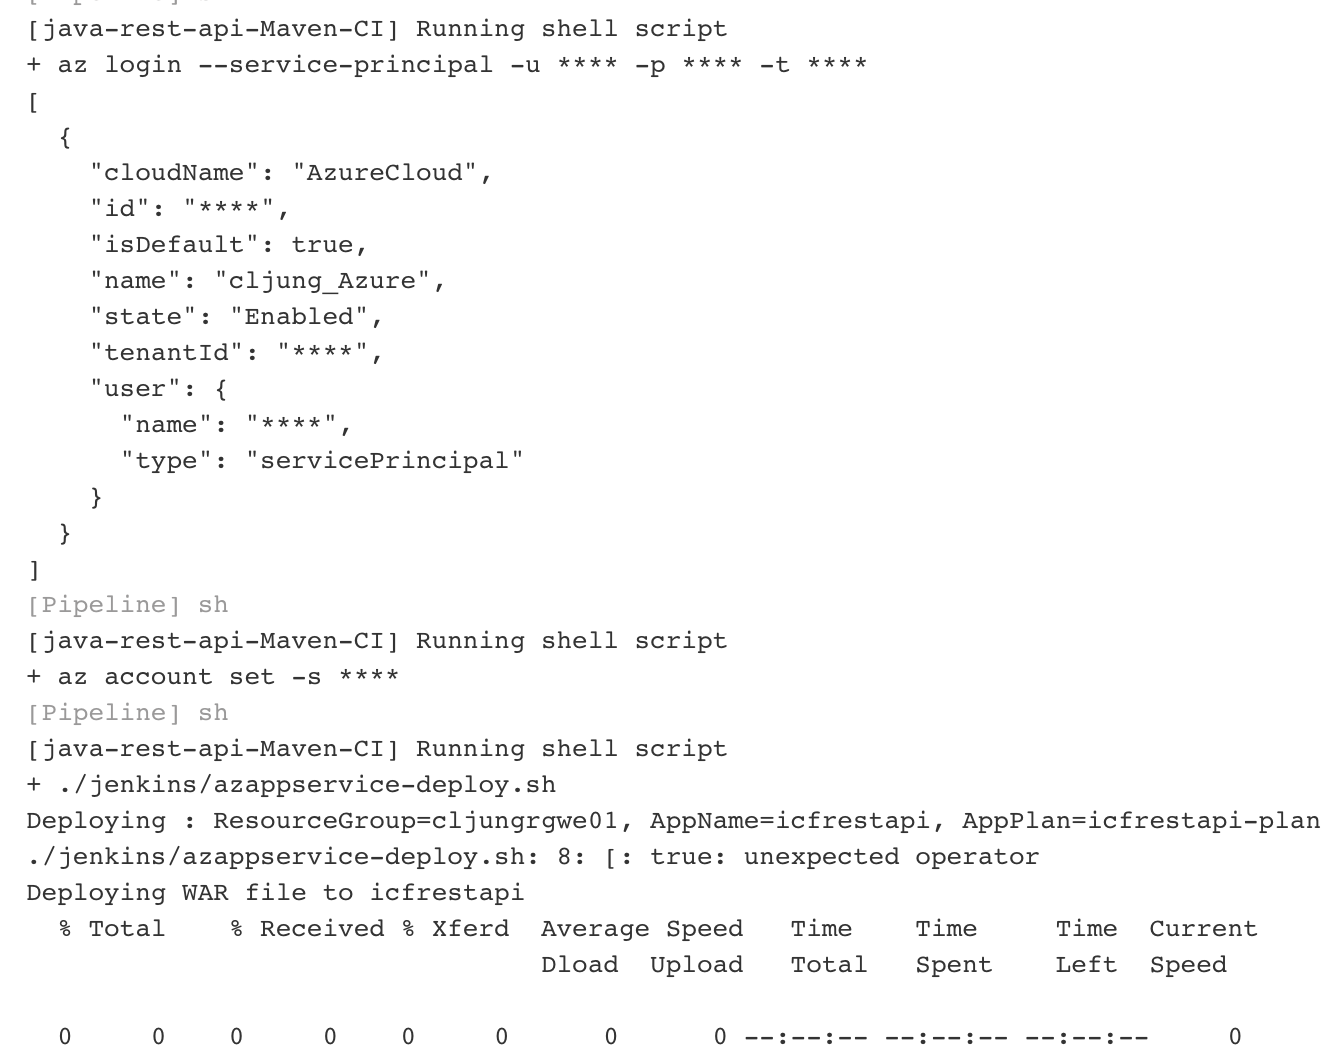
Running the build takes under a minute and the Console Output is filled with standard Maven output. At the end you’ll see Azure CLI in action and the echo outputs from the bash script.
Testing the Java REST API
Testing the Java REST API can be done via the browser immediately after successful deployment. Since this is DevOps with CI/CD, you can change the code, commit to VSTS and redo the build, which will deploy the code again to Azure AppServices.

