Azure AppServices comes with many deployment options to choose from, like Visual Studio Team Services, Github, Bitbucket and some file based copy servives like OneDrive, Dropbox and good old FTP. If you are using an IIS-based web application you can use the WebDeploy technique where you basically upload the deployment as a specially crafted zip-file to a webpage called msdeploy.axd on your IIS server. This can be done directly from Visual Studio or from the command line. But what do you do if you have a Java/Tomcat based application that you build locally? Is FTP the only option then? Well, no, it turns out you can use WebDeploy even for a tomcat based webapp.
Tomcat deployment model
Tomcat deployment model for web applications is based on WAR-files, which stands for Web Application ARchive which really is a ZIP-file with all JavaServlets, css and html-code that the site is made up of. When you deploy a site you drop the WAR-file into a folder named webapps on the web server and tomcat picks that up and unzips it into a folder under webapps. It is a very easy deployment model since it is just one step. Redo the procedure to deploy the next version of your webapp.
IIS WebDeployment model
The above is very similar to IIS WebDeployment model. There you have the web site in a specially crafted ZIP-file that contains the files that the website is made up of (html, aspx and binaries, like DLLs) together with possibly SQL Server scripts that can run as part of the deployment. Although this sounds complex, the contents of the zipfile can be very simple and could infact just contain a file called index.htm (or something) that is your start page, etc. What this really means that the WebDeploy can act as a server side unzipper.
Using WebDeploy for Tomcat based webapps
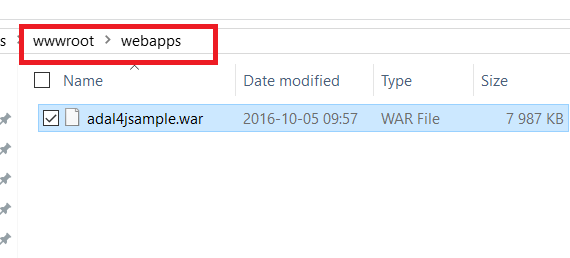
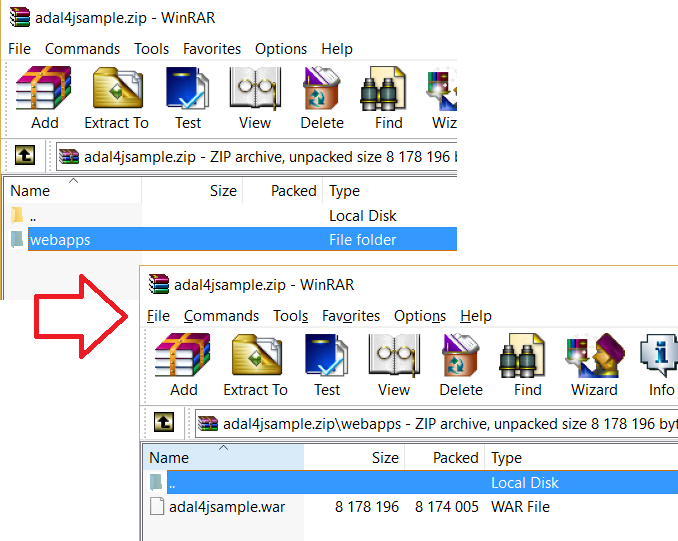
So, zipping the WAR-file and sending it to the WebDeploy endpoint of an Azure based WebApp in AppServices is a possible way to deploy your WAR-file. What you have to do is to put your WAR-file in a folder named webapps and then ask to zip the folder that is parent to the webapps folder (wwwroot in the below screenshot). That way the zipfile will contain the folder webapps and when WebDeploy unzip it, it will create the folder webapps inside AppServices. If you miss this, the WAR-file will end up in the wrong place and Tomcat will not be able to pick it up.
Automating WebDeploy with PowerShell
The PowerShell script to deploy the WAR-file has three major tasks, which are:
- Create the zipfile
- Get the Publishing credentials and endpoint for the Azure AppService WebApp
- Execute WebDeploy to deploy the WAR-file to Azure
Zipping can be achieved via the System.IO.Compression namespace in the DotNet library. All we need to fix before that is to normalize the paths, since the CreateFromDirectory doesn’t seem to work with relative paths. Remember that the $Path variable must be the path up to, but not including, the webapps folder for this to work.
Param(
   [Parameter(Mandatory=$True)][string]$WebSite = "",
   [Parameter(Mandatory=$True)][string]$Path = "",
   [Parameter(Mandatory=$True)][string]$ZipFile = ""
)
# ---------------------------------------------------------------------------
# compress the target path
# ---------------------------------------------------------------------------
$Path = [System.IO.Path]::GetFullPath((Join-Path $pwd $Path))
$ZipFile = [System.IO.Path]::GetFullPath((Join-Path $pwd $ZipFile))

if ( Test-Path $ZipFile ) {
	Remove-Item $ZipFile
}
write-host "zipping $Path to $ZipFile"
Add-Type -Assembly System.IO.Compression.FileSystem
$compressionLevel = [System.IO.Compression.CompressionLevel]::Optimal
[System.IO.Compression.ZipFile]::CreateFromDirectory($Path, $ZipFile, $compressionLevel, $False)
Getting the Publishing credentials and endpoint for the WebApp in Azure can be achieved via invoking the get-AzureWebsite cmdlet. The endpoint is the one containing “.scm.” in the url and this means that this script will work even if the WebSite is deployed in the AppService Environment, where the url is different.
$ws = Get-AzureWebsite -Name $WebSite -ErrorAction Continue
if ( $ws -eq $null ) {
	write-host "Azure WebSite $WebSite does not exist!"
	exit 1
}

# get the web publish url and the uid/pwd
$publishingUid = $ws.PublishingUsername
$publishingPwd = $ws.PublishingPassword
$publishingUrl = ""
foreach( $hostname in $ws.EnabledHostNames) {
	if ( $hostname -match ".scm.") {
	   $publishingUrl = "https://" + $hostname + ":443/msdeploy.axd?site=" + $WebSite
	}
}
Invoking WebDeploy means running the msdeploy.exe utility program on your local computer. This program doesn’t exist on a standard Windows machine. See references for installing it
# ---------------------------------------------------------------------------
# get where msdeploy is located and deploy the app
# ---------------------------------------------------------------------------
$msdeploy="C:\Program Files (x86)\IIS\Microsoft Web Deploy V3\msdeploy.exe"
$rkey = get-itemproperty -path "Registry::HKEY_LOCAL_MACHINE\SOFTWARE\Microsoft\IIS Extensions\MSDeploy\3" -Name InstallPath
if ($rkey -ne $null ) {
	$msdeploy = $rkey.InstallPath  + "msdeploy.exe"
}
# ---------------------------------------------------------------------------
# run msdeploy to deploy the zipfile to Azure
# ---------------------------------------------------------------------------
write-host "Deploying package: $ZipFile"
# set the parameters
$setParams = ""

# run msdeploy.exe
$p = start-process -filepath $msdeploy -wait -NoNewWindow  `
	-argumentlist "-source:package='$zipfile' -dest:auto,computerName='$publishingUrl',UserName='$publishingUid',Password='$publishingPwd',authtype='Basic',includeAcls='False' -verb:sync -disableLink:AppPoolExtension -disableLink:ContentExtension -disableLink:CertificateExtension -enableRule:DoNotDeleteRule -allowUntrusted -retryAttempts:2 $setParams"
Running the script from the command line
Running the powershell script zips the folder, gets the credentials and endpoint and deploys the zipfile

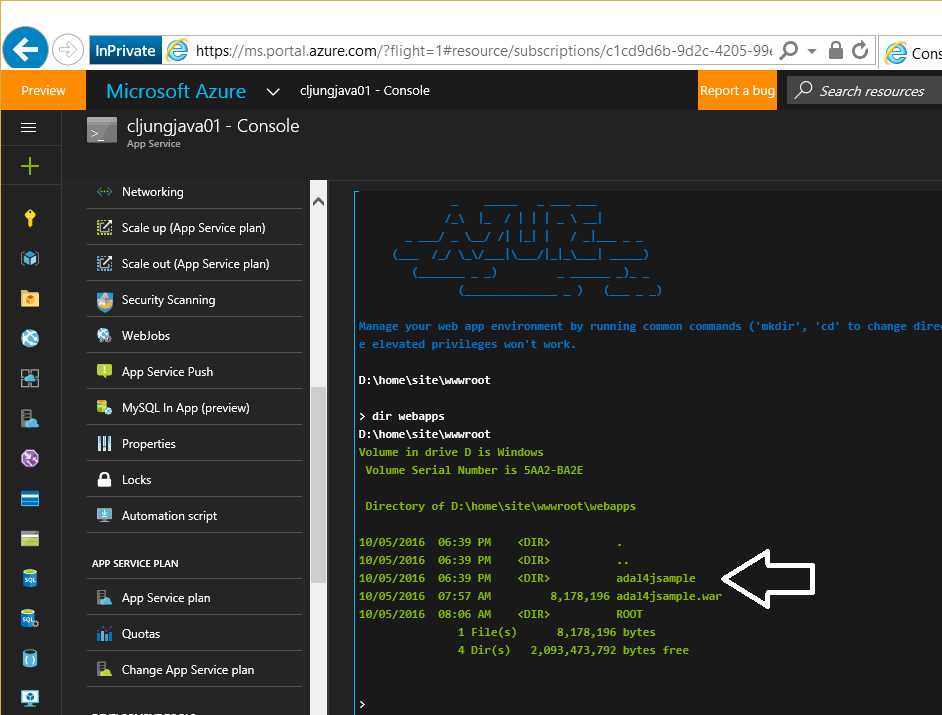
The result can be seen in the Azure Portal Console for AppServices. Notice in the below screenshot that Tomcat hasn’t picked up the file yet since the WAR-file isn’t extracted and there is no folder named adal4jsample. This happens when Tomcat receives the first web request, which takes a little long that usual to execute.

Once you’ve navigated to the website initially, the WAR-file is unzipped and the website is up and running.
Summary
Deploying webapps that are Java/Tomcat based can use the same automation model as a webapp that is based on IIS/DotNet when it comes to Azure. If you are not doing Continous Integration via Github, Visual Studio Team Services or some other tool with direct integration, you can deploy the WAR-file this way saving you the hassle of reverting to FTP. Even though IIS WebDeploy certainly wasn’t intended to be used as a deployment tool for Tomcat, the fact that it is there by default in Azure AppServices makes it possible to take advantage of and have a very close deployment model as DotNet webapps.
References
Installing WebDeployment command line tool msdeploy.exe
https://www.iis.net/downloads/microsoft/web-deploy
Documentation – Deployment options for Azure AppServices
https://azure.microsoft.com/en-us/documentation/articles/web-sites-deploy/
Sources
Github repo with PowerShell script called web-deploy-website-tomcat.ps1
https://github.com/cljung/azps