For the last couple of months I had the privilege of working with a startup company that wanted to migrate from a competing cloud vendor to Azure. They used Tomcat as a web server, MongoDB as a database and were OS agnostic, so the migration wasn’t a problem per se but was a really about options, options and more options.
Since Azure WebApps (WebSites) are IIS only and since IaaS VM’s would be uncalled for, we decided that PaaS Cloud Services was the right way to go. What the Tomcat server actually did was split into two different roles, but that’s beside the point what I’m going to show you here.
The startup guys hadn’t ever laid their eyes on Visual Studio, so the traditional way of packaging and deploying an app to a Cloud Service was out of the question. I needed a way to get software, like Java Runtime, Tomcat and the app packaged and installed using only stuff an Open Source guy would accept.
The objective was the following
- Create a Cloud Service Deployment package with only Powershell and Notepad containing a bootstrapper to load the entire app from Azure Storage at boot time
- Develop the logic that on-the-fly installs all required runtime, like java, Tomcat, etc, and start the app dynamically.
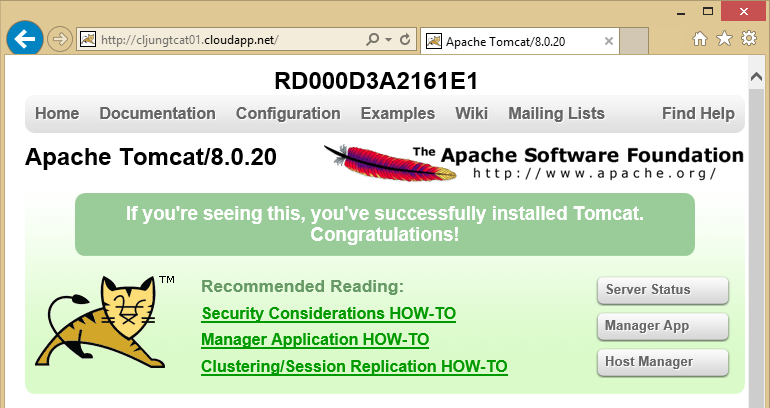
What I’m going to show you here is step 1 and 2 where we will just get the standard welcome page available on the internet from a PaaS Cloud Service Worker Role in Azure. It is going to be somewhat technical but not rocket science and in the end you will be able to reach the Tomcat start page with your browser.
PaaS Cloud Service recap – skip this if you know how it works
The PaaS Cloud Service with its web and worker roles are one of the three original services that Azure had, together with Storage and SQL Azure. The idea is to have a VM that you don’t really care about that much, like a rented car. You check out the keys, drive it but don’t really care about maintenance etc. When you start using the car you have to pretty much adjust everything, like the seat, the mirrors, get your favorite rock station on the radio and more.
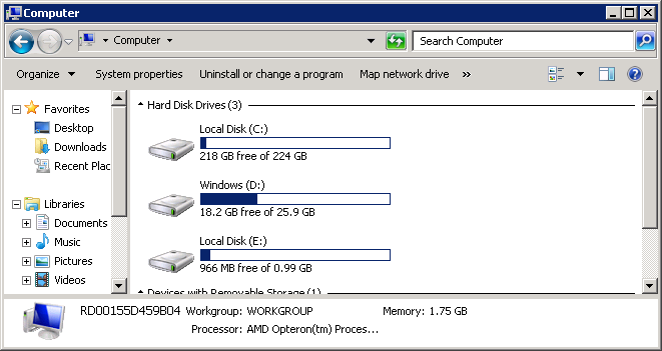
You get a Windows Server that you have a joint responsibility of together with Azure. There are three disks in the VM, none of which are persisted on to Azure Storage like the IaaS VM. The D: drive is the OS disk, the E: drive is your application and the C: drive is used for various purposes, like storing logfiles from the Azure agent.
Deployment of your app is a special process of sending a zip-file with some special Azure content together with your app to the Azure Fabric. The Azure Fabric processes this zip-file and creates a templated vhd file with your unzipped content on it (simplified) to be the E: drive.
Next, you tell the Azure Fabric “I like a VM of size X with the latest version of Windows Server 2012 R2” (X is number of cores and RAM). The Azure Fabric runs out in the warehouse storage area and fetches the latest prebuilt D: drive for you. Then it takes a copy of your vhd template file and mounts it as the E: drive and together with the C: drive for logfiles, etc, it boots the VM. Azure Fabric will then periodically reboot your VM in order to replace the OS Disk with a new one with the latest patches and everything. This happens once a month unless you have opted out this function. This reimaging process means that you should not tweak the OS and turn on/off features since those changes will be lost once a month. If you have to do it, you have to be prepared to repeat the tweaking every time the reimage process happens. The benefit is that you really don’t maintain the VM, you maintain your app and just use the VM.
The true magic happens when it’s time to scale, since scaling is just a matter of repeating the process described on a new VM. The Azure Fabric has saved your template vhd file and your preference for OS version if something called a role and within that role you can scale up and down VMs to the hundreds or more.
Creating the Deployment Package with Powershell
When you deploy an application to a Cloud Service, you need to supply a cspkg and a cscfg file. The cscfg stands for Cloud Service Configuration file is a xml-file containing some basic role information Azure Fabric needs in the creation process. The cspkg file is the zip file and that file requires some special tools to create. It used to be Visual Studio or a command line tool called cspack.exe (which was a tool with lots of wicked behaviours – thank you that we don’t need it anymore).
Now you can create your Cloud Service Dev Project via running the Powershell cmdlets New-AzureServiceProject and Add-AzureWorkerRole.
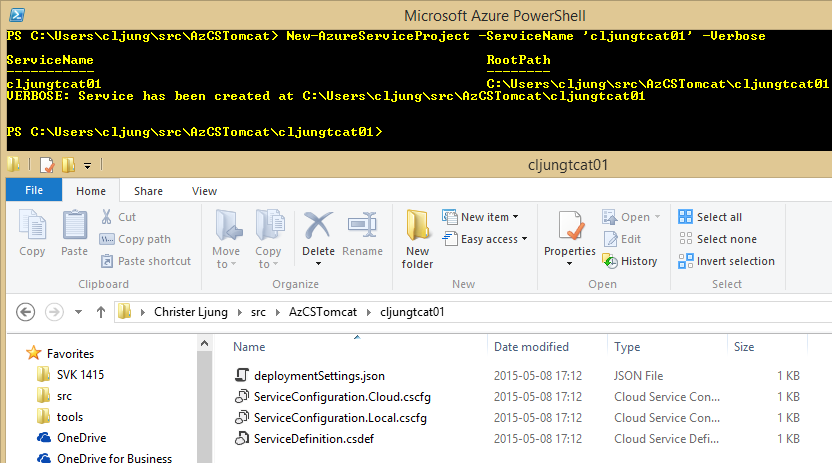
Runing New-AzureServiceProject creates a subfolder with the service name you specified and creates the four basic files you need for deployment, but they are naked so to speak and we need to add a role to it, since the role is what is running when we talk about Cloud Services. To add a role, we use the Powershell cmdlet Add-AzureWorkerRole. It will update the cscfg and the csdef files to add a WorkerRole to it. (We can’t use a WebRole here since Tomcat is a webserver in itself and IIS would be competing on listening on port 80).

The cscfg above is updated with the Role element and we also change the osFamily from 2 to 4 to get Windows Server 2012 R2 as the OS version.
Then it’s time to change the file ServiceDefinition.csdef file to look like the below. What’s in the file in the beginning is just stuff Powershell write since it has to write something. You should, if you follow my example, replace it all with the below. Please not that you will need your own values for the StorageAccount and StorageAccountKey.
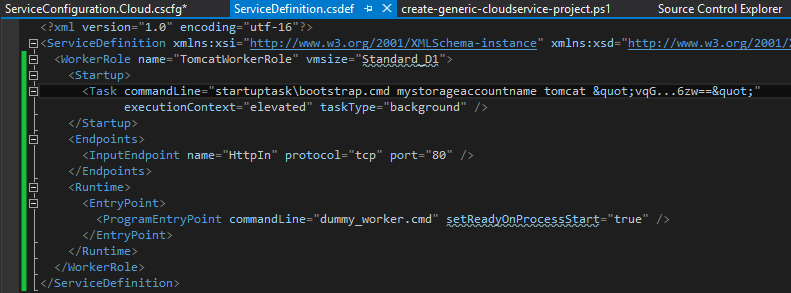
First change is the vmsize=”Standard_D1” to change what Azure VM SKU you will be running on. I have taken a habbit of abandoning the Ax series in favour of the Dx series, since the Dx series gives better performance.
The second change is the Task element. A Startup Task is something that runs once when the machine is created and here is the place to inject our bootstrap code. As you can see, I run a BAT-file in the startuptask folder (relative to wherever the app is deployed on the E: drive) that takes StorageAccountName, a container name and a Storage Access Key as input. It runs with the highest privilegdes so it can update the server as it likes. The taskType=background means “don’t wait for me to finish” to the Azure Fabric. I will explain it further down, but this BAT-file will use the storage account and download java, tomcat and everything else and start it, ie it’s just a bootstrapper.
The Endpoint section needs to be there as we need to make the Azure Fabric aware of that we are going to use an endpoint on port 80.
Finally the ProgramEnrtyPoint needs to be there since the Azure Fabric will wonder “well, what are you going to start?”. We are not starting anything here, that is part of the bootstrapper, but we need to give the Azure Fabric dog a bone here.
So, before actually run then next Powershell script and create (zip) the deployment package, we need to create the bootstrapper BAT-file.
Bootstrapper code
The bootstrapper will basically be a BAT-file invoking the azcopy.exe tool to download the app and all of the required runtime from Azure Storage. To create the bootstrapper, we need to do the following
- Delete everytning in the worker role folder (TomcatWorkerRole in my example)
- Create a folder named startuptask
- Download and install the azcopy tool from http://azure.microsoft.com/sv-se/documentation/articles/storage-use-azcopy/
- The installation procedure of azcopy varies over time, but we need to copy the exe’s and dll’s.
Currently it installs in the C:\Program Files (x86)\Microsoft SDKs\Azure\AzCopy folder, so navigate there and select all relevant files (usually the exe and dll’s) - Paste all files selected above in the startuptask folder
- Create a file named startuptask\bootstrap.cmd in the startuptask folder with the following content
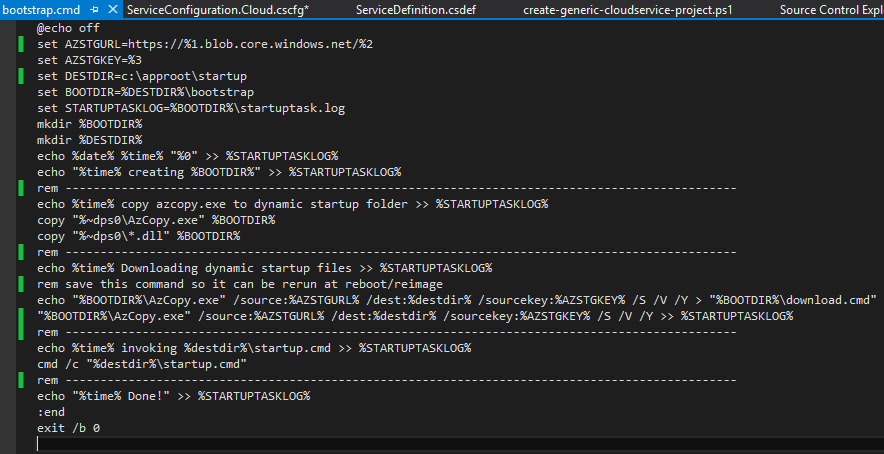
What this file does in short is the following:
- Downloads everything from the Azure Storage Account specified in the 1st parameter and in the container name specified in the 2nd parameter to the (hardcoded) location of c:\approot\startup
- Runs the file c:\approot\startup\startup.cmd that was downloaded in step 1
Note that the second BAT-file will inherit the environment variables and therefor get access to the Azure StorageAccount Name and Key.
So, basically what we are doing here is saying – download everything from Azure Storage when the Cloud Service starts and then continue with running something that was just downloaded. You can reuse this over and over again and just modify what you have in Azure Storage that gets downloaded.
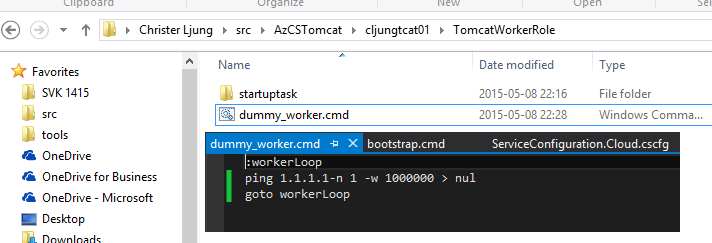
We also need to create the dummy_worker.cmd file in the parent directory to startuptask with the very scilly content of the below picture – basically a very long sleep loop
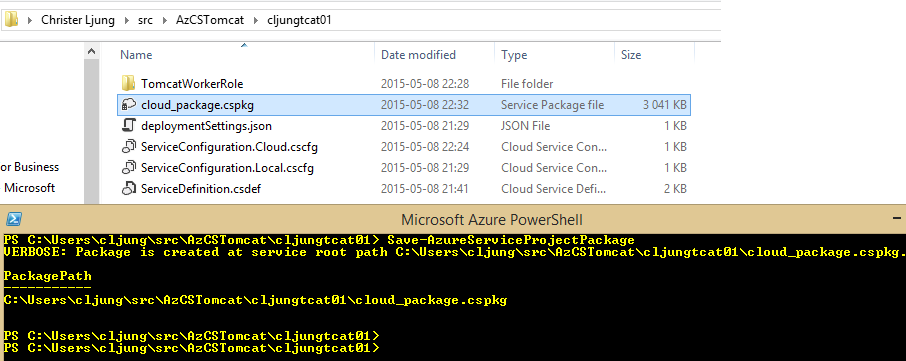
Create the Cloud Service Deployment Package
Now we are all done with what should be deployed to the Cloud Service since it contains our bootstrapper. We can create the deployment package via the Save-AzureServiceProjectPackage cmdlet. This effectively creates the cloud_package.cspkg file by zipping the content of the TomcatWorkerRole we have created and the bootstrapper code. If you made any mistake and need to change the bootstrapper, you need to rerun this cmdlet to create a new version of the cspkg file
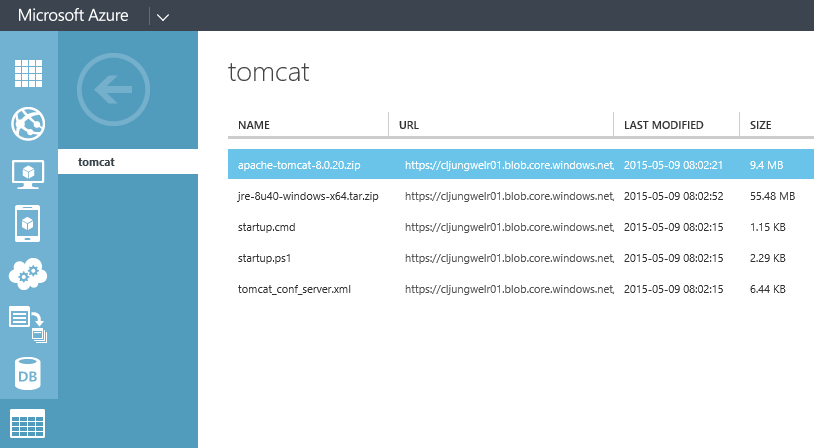
The Payload that azcopy downloads from Azure Storage
The dynamic payload that the bootstrapper downloads is a simple as below. It contains five files. The zip-files are downloaded from internet containing the java runtime enrvironment and the apache-tomcat. You must make sure that the zip files contain files that can be used in an xcopy deployment scenario and not msi or exe files containing installation packages – I did a simple deployment.
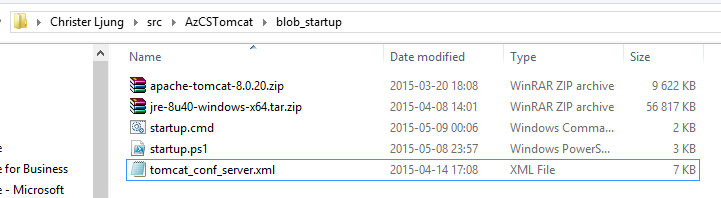
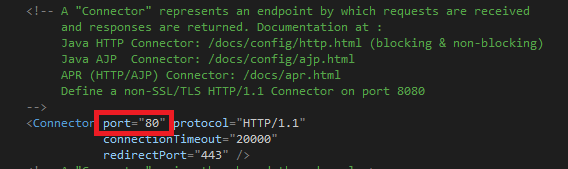
The tomcat_conf_server.xml file is just the standard copy of the Catalina conf\server.xml file where I have set the default endpoint to port 80 so that Tomcat will respond to browser requests.
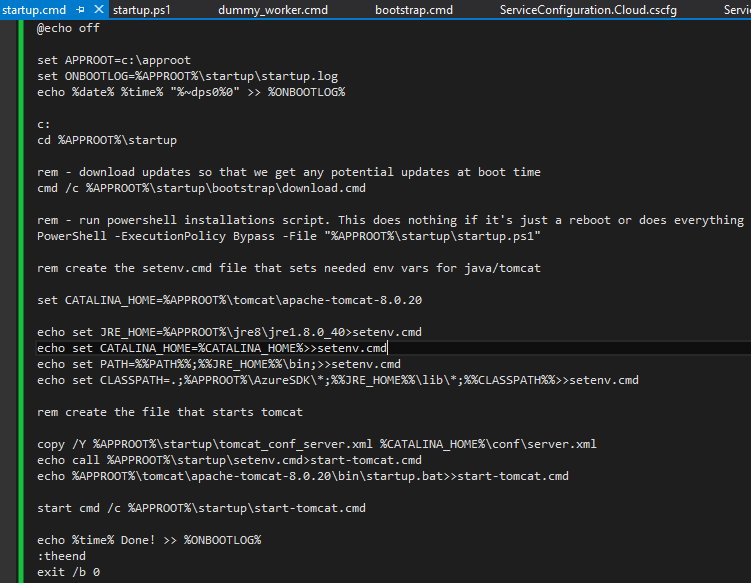
The startup.cmd and the startup.ps1 is where it all happens. If you go back to the bootstrapper you will see that the bootstrap.cmd ends with calling startup.cmd (which the azcopy have downloaded). The tasks of startup.cmd is the following
- Run the azcopy download again (same as the bootstrapper did) since this might be a reimage and we must make sure we have everything if we find out later that it is
- Run the startup.ps1 Powershell script that does the more complex installation process (since Powershell is far more powerful than a BAT-file)
- create a file called setenv.cmd that sets the environment variables JRE_HOME, CATALINA_HOME and the PATH
- Start up Tomcat
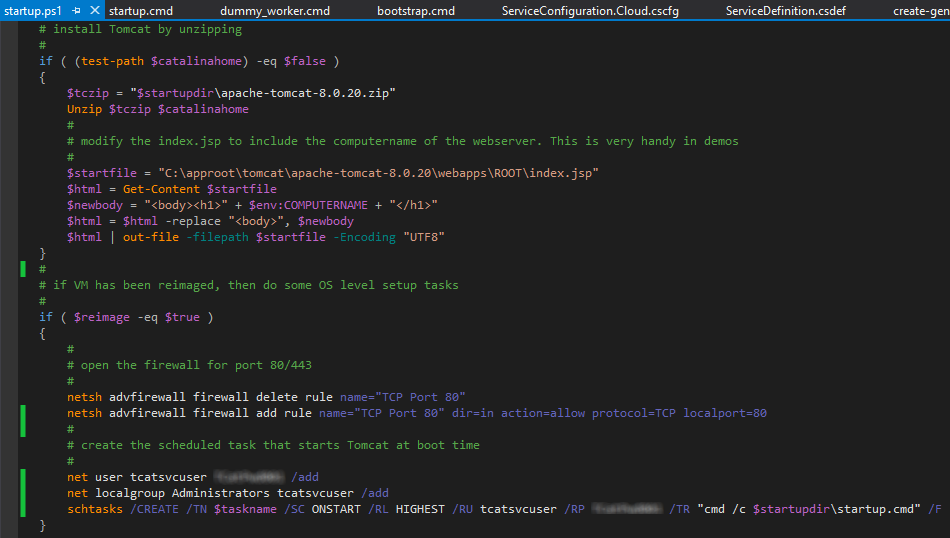
The startup.ps1 does the following
- Unzips the java and the tomcat zip files to get our runtime in place
- Modify the Tomcat start page to include the Computer Name for demo purposes
- opens port 80 in the firewall
- creates a scheduled task that executes at boot time that starts the file startup.cmd
The last part actually makes sure that the whole bootstrap process is repeated every time the machine reboots. If the scheduled task does not exists, we know that we have been reimaged and if that is the case, we should perform the above tasks, else the startup.ps1 script does absolutly nothing. Ie this is a self-healing process.
Finally, put this in the StorageAccount and the container that the bootstrapper points to, ie what you typed in the csdef file. For this you can use Cerebrata, CloudXplorer or even azcopy that you by now have on your dev machine. It should look like this. Since the startup.cmd downloads *.* when it runs, you can add stuff like procmon, procexp in this storage container and it will be downloaded next times it runs.
Deploying the package and take Tomcat for a spin
Now we are ready to deploy everything and once we do it will bring up the tomcat server automatically. The deployment is done via the Powershell cmdlet Publish-AzureServiceProject which takes the Cloud Service name and the Location where you want to deploy this service. As you can see from the console output below it uses the Azure subscriptions default storage account to upload and store the cloud_package.cspkg file, The whole process takes some 4-5 minutes.
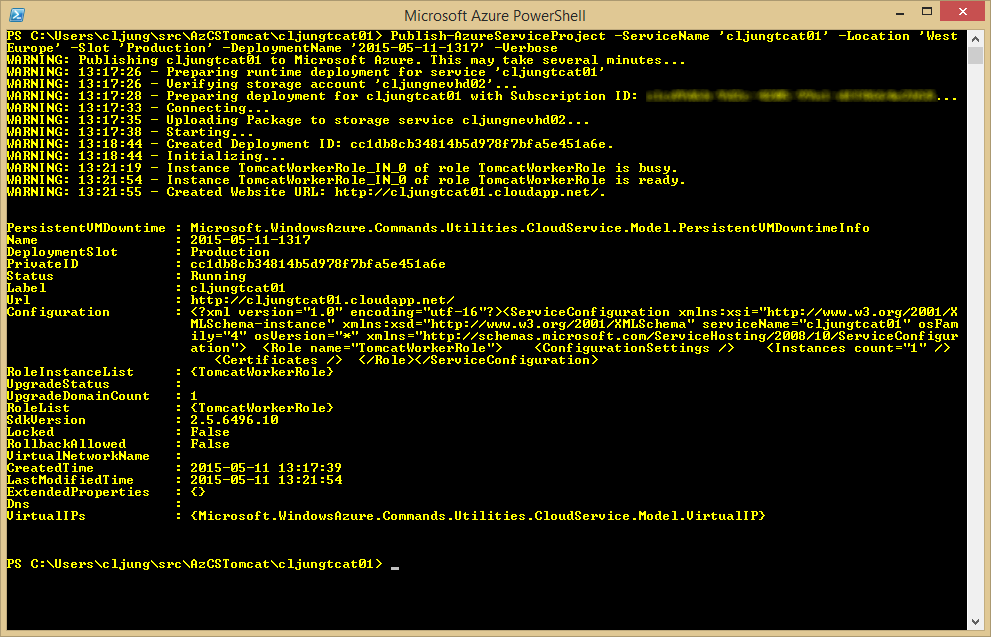
Once the last output completes, leave some time for the startup.cmd to complete since it will now download and install what’s in the storage account. This is an async process since we in the csdef file specified the Startup Task as taskType=”background”.
The cool part – scaling
You could argue with validity that all that we’ve done is some very low level technical mumbo-jumbo to get a Tomcat server to run with lots of script code that really doesn’t add any value. You could have done this in an Azure IaaS VM and avoided the script code completely. However, imagine that this solution is a consumer facing website and needs to scale quickly depending on what load we see. This is where the PaaS Cloud Service shine, because we don’t need to do anything more from now on, more than adjust a slider bar (or execute 1 line of Powershell) to create the next servers.
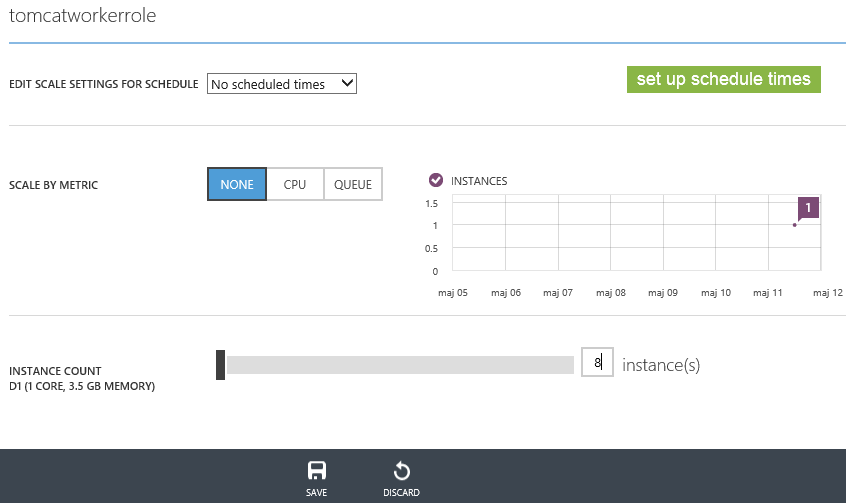
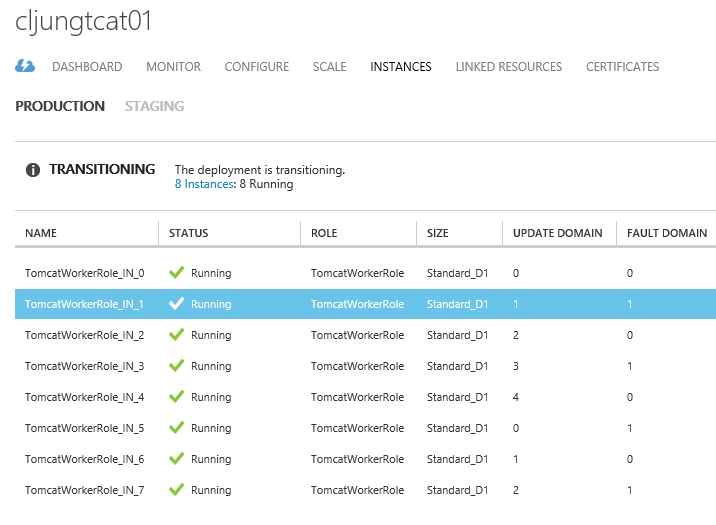
Heck, let’s go for 8 servers directly since I feel lucky today and business will start to pour in at large scale.
What really happens here is that Azure Fabric finds 7 new VMs, shoots in the cspkg payload which runs the bootstrapper which downloads and installs the bits from Storage Account.
The feature auto-scaling can then be used to trim the number of needed servers based on a schedule, like daytime/night time/weekend etc, CPU load or by number of messages in a Service Bus Queue or some other metric.
Summary
The objectives for this blog post were to create a Cloud Service Deployment with Powershell/Notepad and to create a mechanism that automatically downloads, installs and runs a java/Tomcat solution.
The creating of the Cloud Service project was done via New-AzureServiceProject, Add-AzureWorkerRole and Save-AzureServiceProjectPackage. The Deployment is done via the Powershell cmdlet Publish-AzureServiceProject.
The automatic download/install/execution is achieved by using a Cloud Service Startup Task that executes a bootstrapper that downloads the payload from Azure Storage. The payload itself contains the last phase that installs and executes what is downloaded.
Somewhat techie, yes, but this way you can avoid using IaaS VMs when rehosting applications and achieve scalability very easily.
The source code is available here.
http://data.redbaronofazure.com/public/AzCSTomcat.zip