In both Entra Workforce tenants and Entra External tenants, you can add your own custom authentication extensions. In a workforce tenant, you should think twice before adding custom code to your authentication scenarios as you most likely don’t need it. In external tenants, there is a likelihood that you will need it. What you can do differs between the tenant types:
- Workforce – Token Issuance, Account Recovery with Verified ID
- External – Token Issuance, Attribute Collection Start & Submit, EmailOtpSend, and Password Migration
In detail, the different types can help you with:
- Token Issuance – add custom claims to the issued id and access tokens from the source of your choice (backend system, etc).
- Account Recovery with Verified ID – special case where you do account recovery when a user is completely locked out and you need a hook to compare the claims in the presented Verified ID, issued by an identity proofing partner, with some backend HR system, etc.
- Attribute Collection Start & Submit – When a customer signs up to your CIAM application and you want to prefill and validate claims captures during signup. In the Start extension, you can fetch values from your backend order systems (perhaps the customer already exists) or derive values like geo-location based on ip address. In the Submit extension, you get a chance to validate and clean up entered data.
- EmailOtpSend – If you want to roll your own sending of OTP codes to end users via email or SMS.
- Password Migration – It is a classic problem when you migrate users in CIAM systems that you don’t know the passwords of users in the system you migrate from. This extension can be used to reach out to the system being retired and validate the password during a migration period. Once the other system says OK, Entra will set the password and know it from then on.
In this post, I will show you how to create and configure a Token Issuance extension. In a later post, I will show you how to extend that with Password Migration.
Configuring a Custom Authentication Extension
In your Entra External tenant, you need to do three things:
- Register an application with permission CustomAuthExtension.Receive.Payload that will be used for creating an access token to call you custom API. The AppID will show up as the ‘aud’ claim.
- Define your custom extension so Entra knows how to call you
- Configure custom claims provider on the service principal for the app that end users will login to.
Step 1 – Register an application with permission CustomAuthExtension.Receive.Payload
There need not be a lot of detail for the application, because you only use it to give Entra permission to call your API. Just give the app a name (like CIAM-custom-auth-extension-app) and add the permission. Microsoft Entra ID uses OAuth 2.0 client credentials grant flow to secure the call to your API endpoint and in that process it uses this permission for scope.
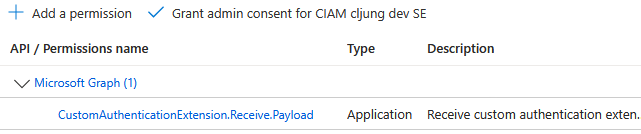
The quirky thing to get right is to set the IdentifierUris to the correct value. It must have an entry with the value of
api://<your-FQDN-where-you-host-your-API>/<appID>. This is to make sure the Entra knows that it is calling a legitimate endpoint authorized by you. In my dev environment, it looks like below. The guid is just the AppID of your app.

Step 2- Define your custom extension
- Entra Admin Center > External Identities > Custom authentication extensions > + Create a custom extension
- Select TokenIssuanceStart and click Next
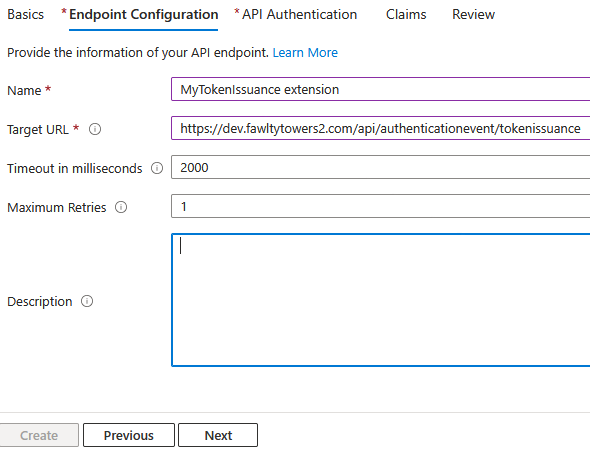
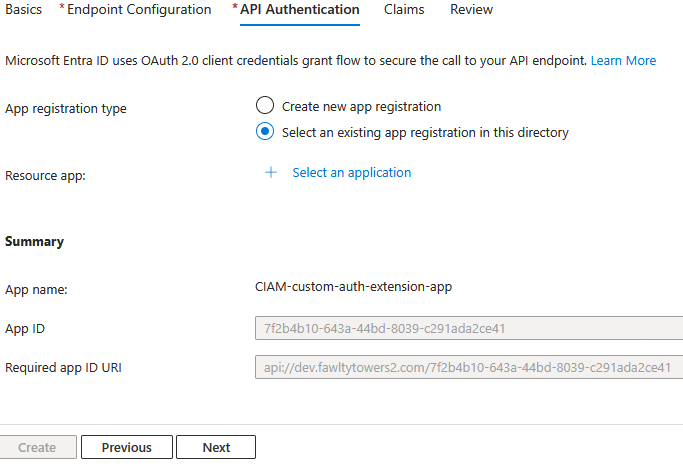
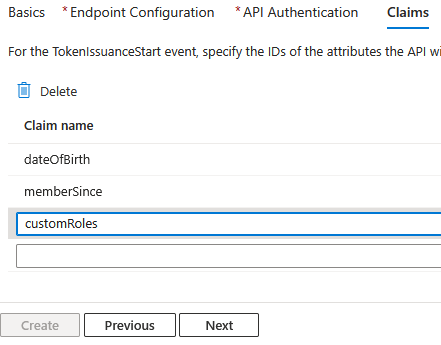
The third screen is where you define what claims are returned from your extension. Here you should add them just as you return them from your API – no name decoration needed. If your API returns more claims now or you add them later, Entra will simply ignore them until you add them. After you have created your extension you can add or remove claims as you like.
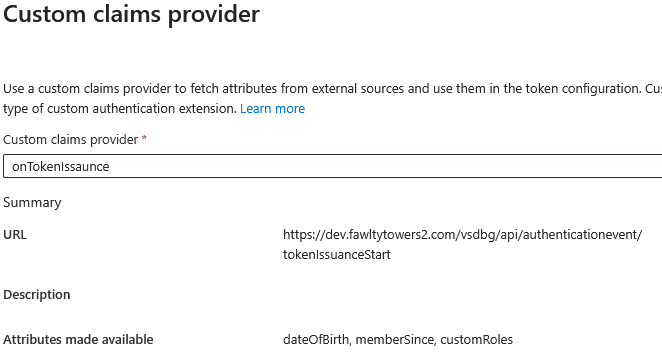
Step 3 – Configure custom claims provider on the service principal
In order to create the binding between the custom extension and the app that end users use to login to, we need to add the extension as a custom claims provider to your app’s service principal.
- Entra Admin Center > Enterprise apps > Select your app > Signel sign-on
- Click on Edit for Attributes & Claims
- Open the Advanced settings section and click Edit next to Custom claims provider
- Select your custom extension in the dropdown list and click Save

How Entra is calling your API
Microsoft documentation provides sample code for an Azure Function that uses Managed Identity and pre-auth before hitting your code. If you host your on API in an aspnet app, you need to be aware of how to authenticate the incoming call.
The access token your app will receive will be issued by your tenant (see iss and tid claims). The aud claim will be the appId of the app you registered with the CustomAuthExtension.Receive.Payload permission. This is how you can be sure that this is an authorized caller. The claims azp and oid is Entra’s multi-tenant app for making the call.
{
  "aud": "a3126a46-def7-49e2-8e96-2e46c6252503",  // appId of the registered custom extension app
  "iss": "https://90a979a4-58af-4784-b3c3-9a36fb1d6436.ciamlogin.com/90a979a4-58af-4784-b3c3-9a36fb1d6436/v2.0",
  "azp": "99045fe1-7639-4a75-9d4a-577b6ca3810f",  // appID for SP "Azure Active Directory Authentication Extensions"
  "oid": "34d97ed7-a7b1-4f58-a9a7-85770c2d5112",  // objectID for -"-
  "sub": "34d97ed7-a7b1-4f58-a9a7-85770c2d5112",
  "tid": "90a979a4-58af-4784-b3c3-9a36fb1d6436",
}
If your extension supports multiple client apps where the behaviour varies between the apps, the access token will not be your friend. Instead in the request JSON there will be something called the authenticationContext that have the details you are looking for. In the clientServicePrincipal, you have the details of the app that the end user is signing in to.
"authenticationContext": {
  "correlationId": "a2b1f0dd-19f6-43a9-be18-3ba36ad419a0",
  "client": {
    "ip": "321.418.945.255",
    "locale": "en-gb",
    "market": "en-gb"
  },
  "protocol": "OAUTH2.0",
  "clientServicePrincipal": {
    "id": "a70c1626-70cf-4657-9e4e-bbd8e8908d4e",
    "appId": "4678df57-ae15-4440-af00-0bb82fbc003d",
    "appDisplayName": "ciam-test-app",
    "displayName": "ciam-test-app"
  },
Who the user is currently logging in is passed in the user section of the request. The userPrincipalName is in the Entra External decorated format, but the mail attribute is more suitable for doing lookups in external systems.
"user": {
  "id": "111111-222-333-4444-5555555555",
  "userPrincipalName": "111111-222-333-4444-5555555555@foobar.onmicrosoft.com",
  "userType": "Member",
  "createdDateTime": "2026-09-15T13:08:10Z",
  "displayName": "John Doe",
  "mail": "johndoe@hotmail.com"
}
What you return to Entra
If you return a 400 Bad Request or any other unsuccessful HTTP status code, the tokens will not be issued and the login flow will be unsuccessful. If you return a 200 OK, Entra expects a JSON response like the following. Your app simly adds your custom claims in the claims section.
{
  "data": {
    "@odata.type": "microsoft.graph.onTokenIssuanceStartResponseData",
    "actions": [
      {
        "@odata.type": "microsoft.graph.tokenIssuanceStart.provideClaimsForToken",
        "claims": {
          "dateOfBirth": "1980-01-01",
          "customRoles": [
            "Moderator",
            "Writer",
            "Reader"
          ],
          "memberSince": "2026-09-15"
        }
      }
    ]
  }
}
There is another “gotcha” and that is that Entra expects you to return the response within 2 seconds. If you are debugging and hanging on a breakpoint, you will see the second call coming in after the first 2 seconds and then the login flow in the browser will fail.
Cleanup after testing
If you want to cleanup after testing, you need to delete the resources in the following order:
- Enterprise apps > Remove the Custom Claims Provider on the Enterprise app (otherwise, it will be “in-use”)
- External identities > Remove the Custom Authentication Extension
- App registrations > Remove the app with the CustomAuthExtension.Receive.Payload permission